Dictionaries builder
Dictionaries are one of the types of assets that are available in ProcessMIX — a tool designed for the tabular viewing of various data.
To access them, go to the Explorer panel in the Assets section. It contains a tree of all Assets in the project and existing Dictionaries if they already exist.
The Assets tree in the Project Explorer panel may include the following:
- Dictionary
- Scorecard
- Decision table
- PMML.
Double-clicking on any Dictionary opens a tab with the Dictionary builder.
How to create the first Dictionary?
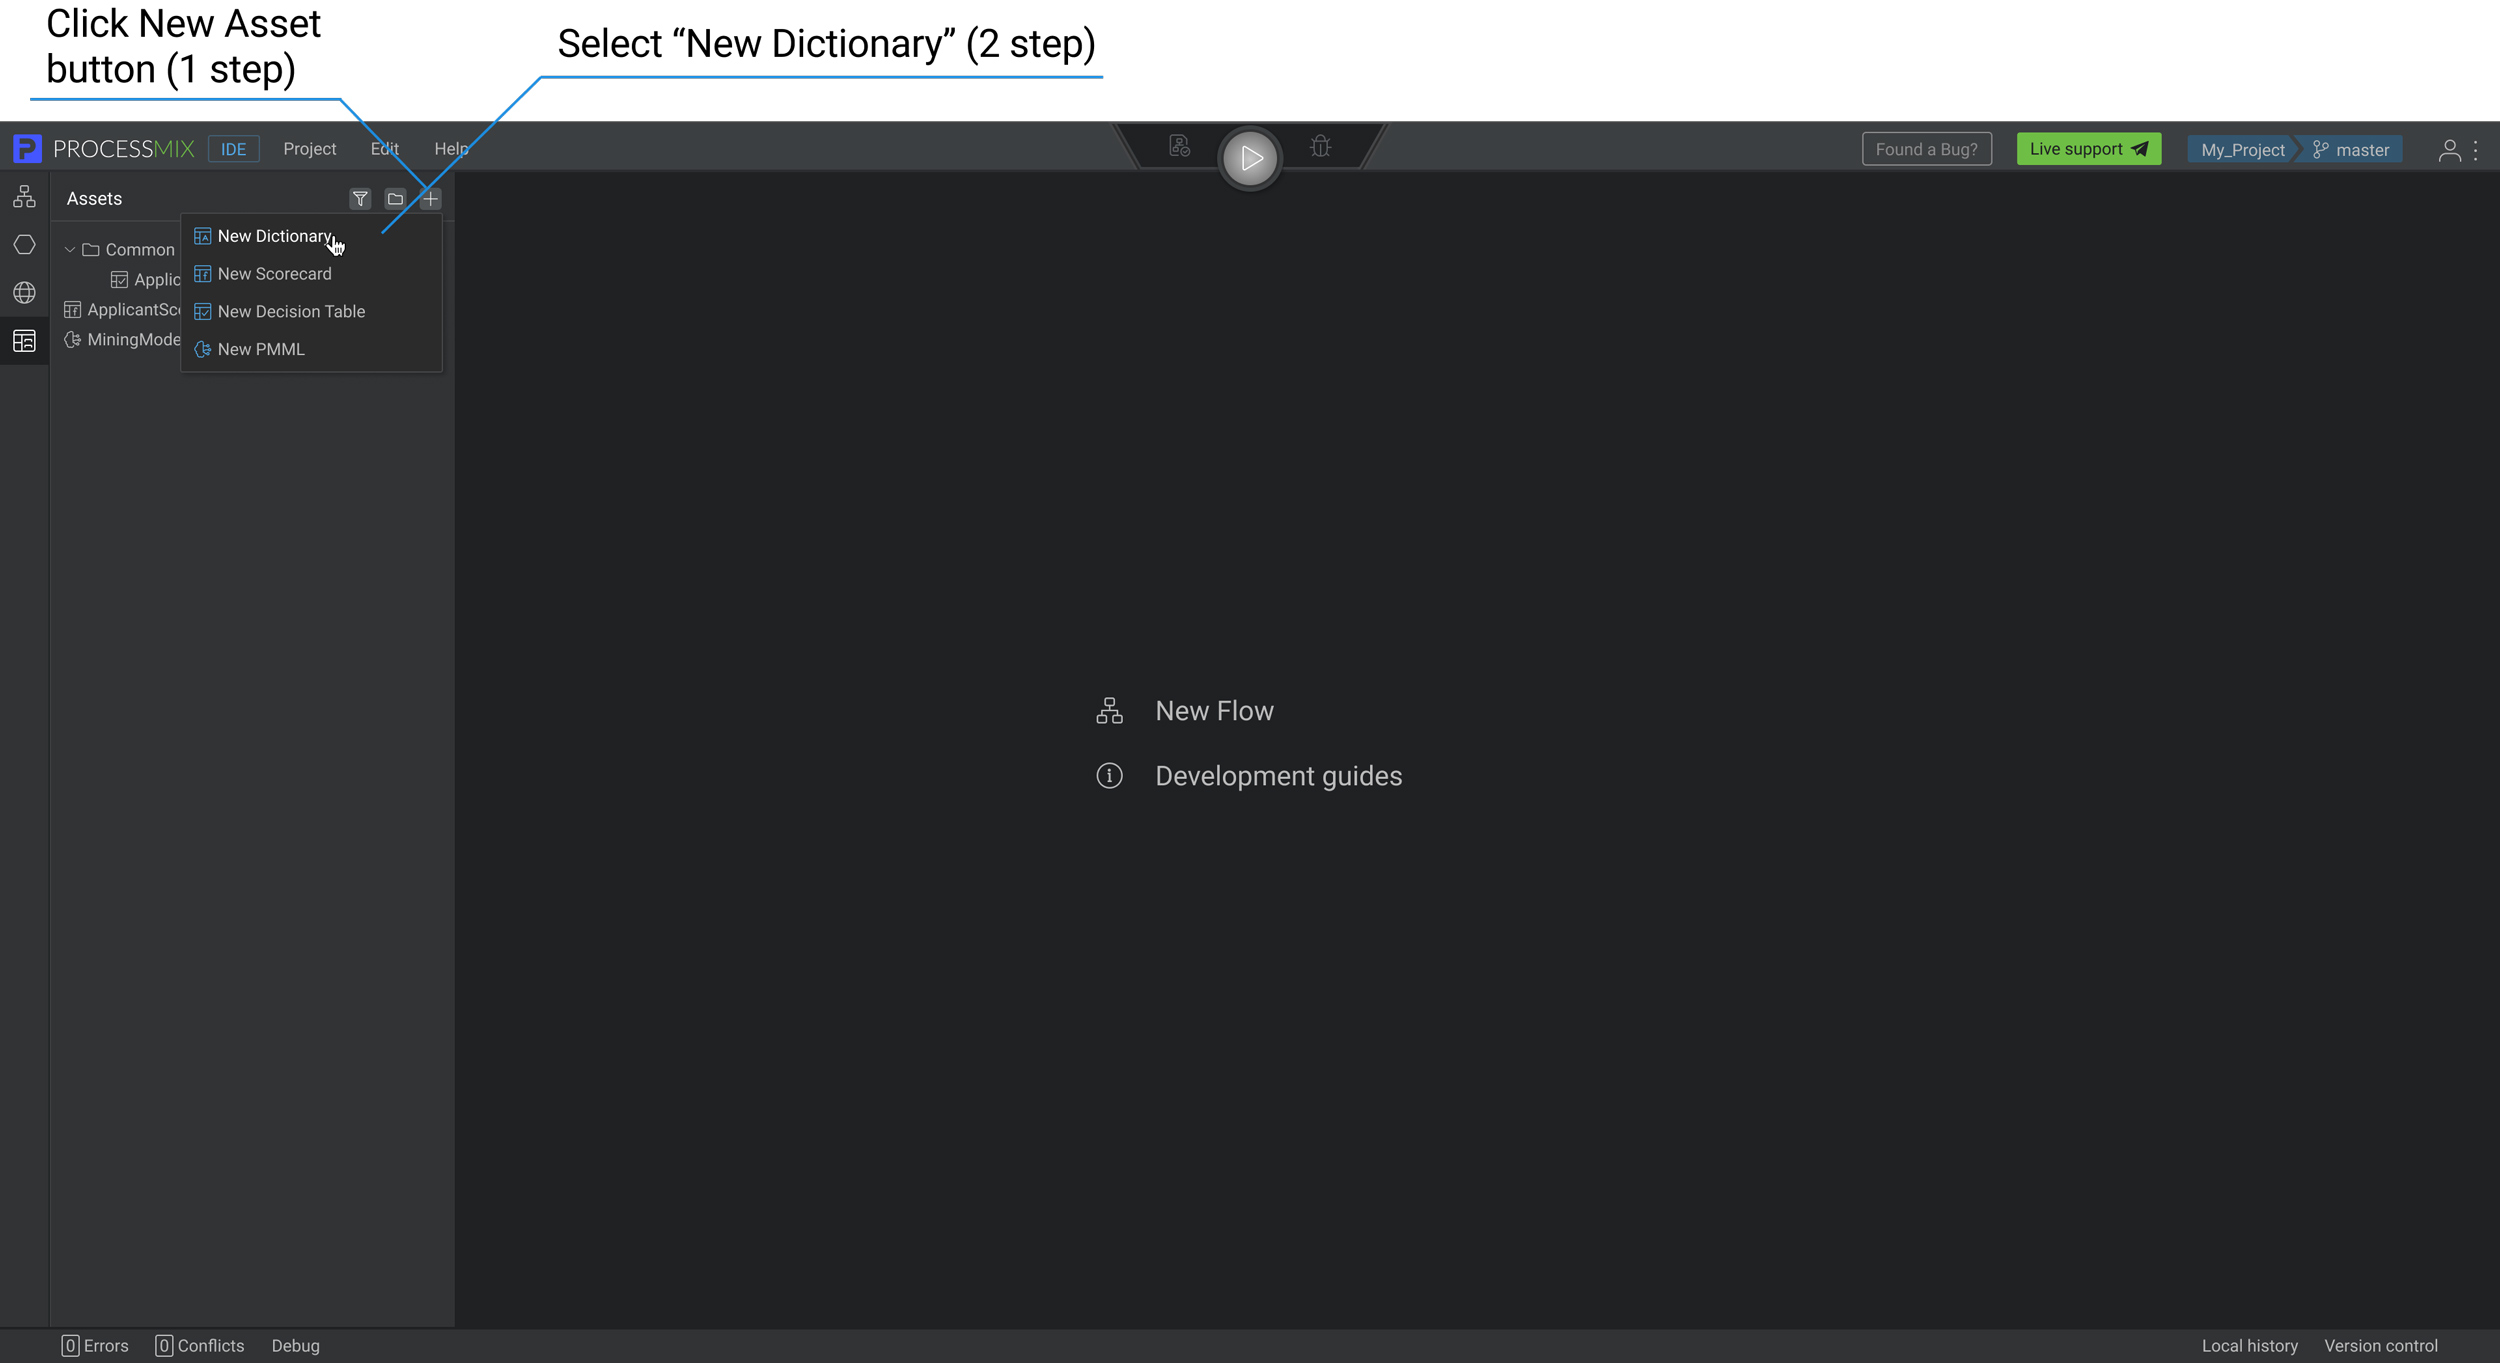
To create a new Dictionary, select the Assets icon on the Project Explorer panel — left end panel. It should show the Assets entity. Now create a Dictionary by clicking on the icon on the Explorer panel and selecting New Dictionary.
To create an asset in a folder, select the desired folder and after that, click on the icon. In the pop-up window, enter the Dictionary name and click the CREATE button.
The Dictionary’s name should be longer than 1 symbol and shorter than 100. It can contain the letters (Latin a-z A-Z), numbers 0-9, $, and an underscore. Beginning from a letter or underscore character. The name of the dictionary must be unique within the level where it is created (folders or tree root).
The Dictionary has been created.
Regardless of which Dictionary type is used, based on the structure of the fields created in the dictionary, a structure will be generated. This can be found in the Structures section of the Explorer panel. Also, the user can reassign the structure to be used. When changing the field structure in the dictionary settings, the referenced structure will also change.
How to set up a Dictionary?

In the platform, there are 2 types of dictionaries available:
- Reason code — provides information about the source of problems with a description. It is used when working with Scorecards where the ‘Use reason code’ option is active.
- Custom — provides information about user data in an arbitrary structure.
To continue working with a specific type of dictionary, select the type in the Dictionary settings section.
To add a Description to the Dictionary settings, click on the description section and enter the value.
Preservation occurs when starting/switching work with another entity or closing a tab.
How to work with a custom type Dictionary?
After a dictionary is created, it is classified as Custom type by default. it is possible to add additional fields and change their types.
To add a new parameter. Click on the icon in the parameter’s section, then click on the String data type and select the desired data type if required. Click on the name of the field and change the name (optional).
The parameter’s name should be longer than 1 symbol and shorter than 255. It can contain letters (Latin a-z A-Z), numbers 0-9, $, and an underscore. Beginning from a letter or underscore character.
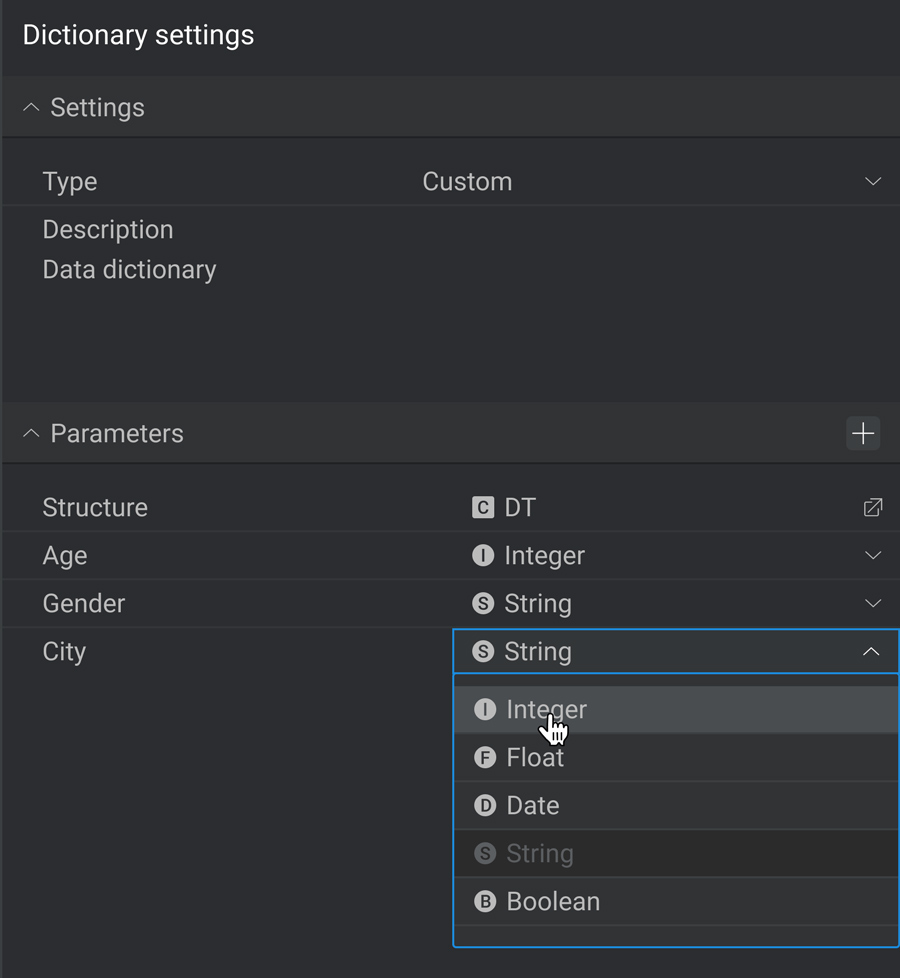
Supported data types for fields:
- Boolean — value “true” or “false”;
- String — text, for example, “Peter Petenson”;
- Integer — number, for example, “22”;
- Float — floating-point or decimal number, for example, “0.1234”;
- Date — specify the date value in the format yyyy-mm-dd, for example, ‘’1993-05-31’’.
After changing the parameters’ composition or their type, the same changes are applied to the auto-generated structure.
It is possible to change the use of an auto-generated structure in the dictionary to another one in the Structure drop-down list at the top of the Parameters section in the dictionary builder.
After cloning a dictionary, it will refer to the same structure as the main dictionary. The structure used can be changed if necessary.
Additional operations with parameters
Select a parameter on the Dictionary settings section. By clicking the right mouse button, a context menu opens through which a number of operations are available.
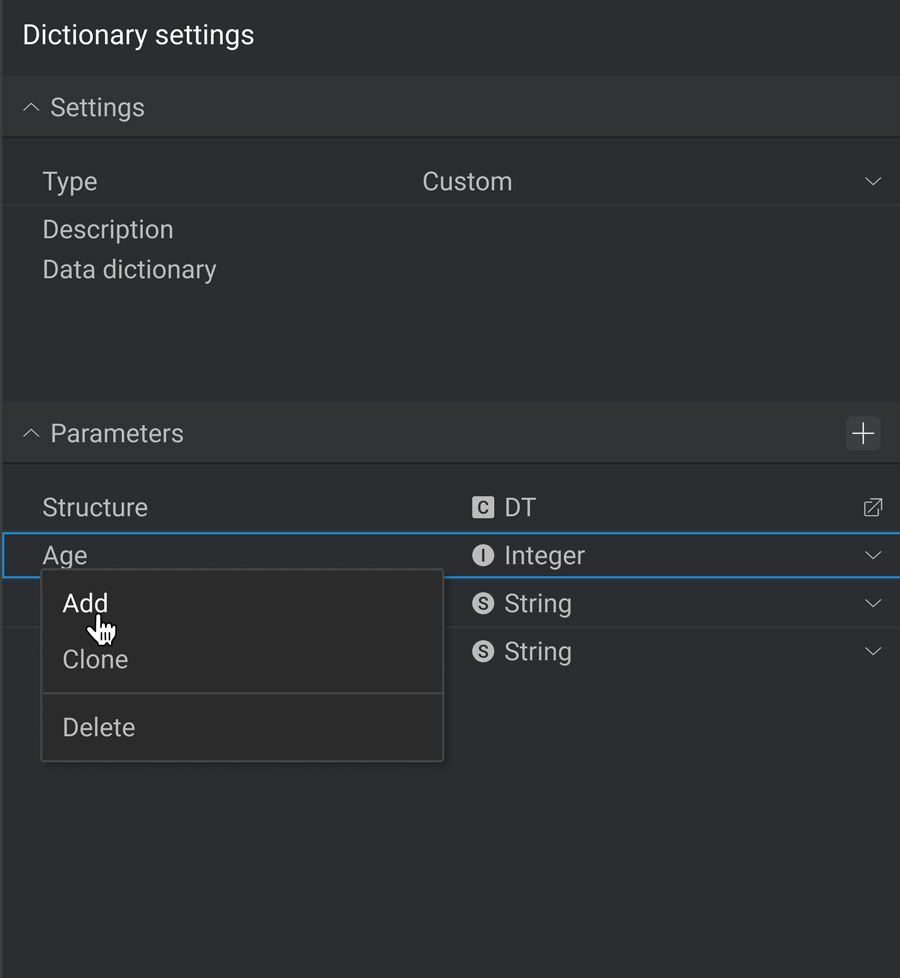
Let’s see what operations are possible:
- Add — allows you to add a new parameter.
- Clone — allows you to create a clone of the parameter. The cloned flow will have the same name as the Name of the parent parameter + Clone(n).
- Delete — allows you to delete the parameter.
How to work with reason code type?
After the type of dictionary Reason code has been chosen, a list of parameters that you must work with appears. Adding additional parameters is possible but changing the type of required parameters will result in errors.
Required parameters:
- Rank (integer) — error rank.
- Name (string) — error name.
- Code (integer) — error code.
- Message (string) — error message.
How to work with Dictionary data?
In the central part of the Dictionary builder, it is possible to enter the necessary data into the table according to the types of parameters.
- To add an additional row above, click on the Add Row Above
icon in the panel above the table.
- To add an additional row below, click on the the Add Row Below
icon in the panel above the table.
- To Remove a row, select the row and click on the Remove Row
icon in the panel above the table.
- To Cut a row, select the row and click on the Cut Row icon
icon in the panel above the table.
- To Paste a row, select the row and click on the Paste Row
icon in the panel above the table. This is not available unless you have previously used the Cut options.
- To Add a column before, select the column and click on the Add column before
icon in the panel above the table. Then create a new parameter and select its type. (Available only for dictionary type Custom).
- To Add a column after, select the column and click on the Add column after
icon in the panel above the table. Then create a new parameter and select its type. (Available only for dictionary type Custom).
- To Remove a column, select the column and click on the Remove Column
icon in the panel above the table. (Available only for dictionary type Custom).
 Visual Development
 Assignment of risk level and customer category within KYC processes at customer onboarding
 Cross-Sell Offer Calculation for the 12M Client Base
 icon in the panel above the table.
 icon in the panel above the table.
 icon in the panel above the table.
 icon in the panel above the table.
 icon in the panel above the table. This is not available unless you have previously used the Cut options.
 icon in the panel above the table. Then create a new parameter and select its type. (Available only for dictionary type Custom).
 icon in the panel above the table. Then create a new parameter and select its type. (Available only for dictionary type Custom).
 icon in the panel above the table. (Available only for dictionary type Custom).