S3 connector builder
The S3 Connector builder is a component that allows interaction with Simple Storage Service (S3) Amazon Web Services. To do this, you need to create an S3 connector, configure it and then use it in the flow using the S3 Connector node. To view information about the node, go to the Nodes guide.
Before creating an S3 connector, make sure that you have Amazon Access Key ID and AWS Secret Access Key values issued by Amazon. You can save these values in the Global Variables component to use when configuring the connector. Amazon Access Key ID should be saved as a variable, and the AWS Secret Access Key should be saved as a password.
How to create the first S3 Connector?
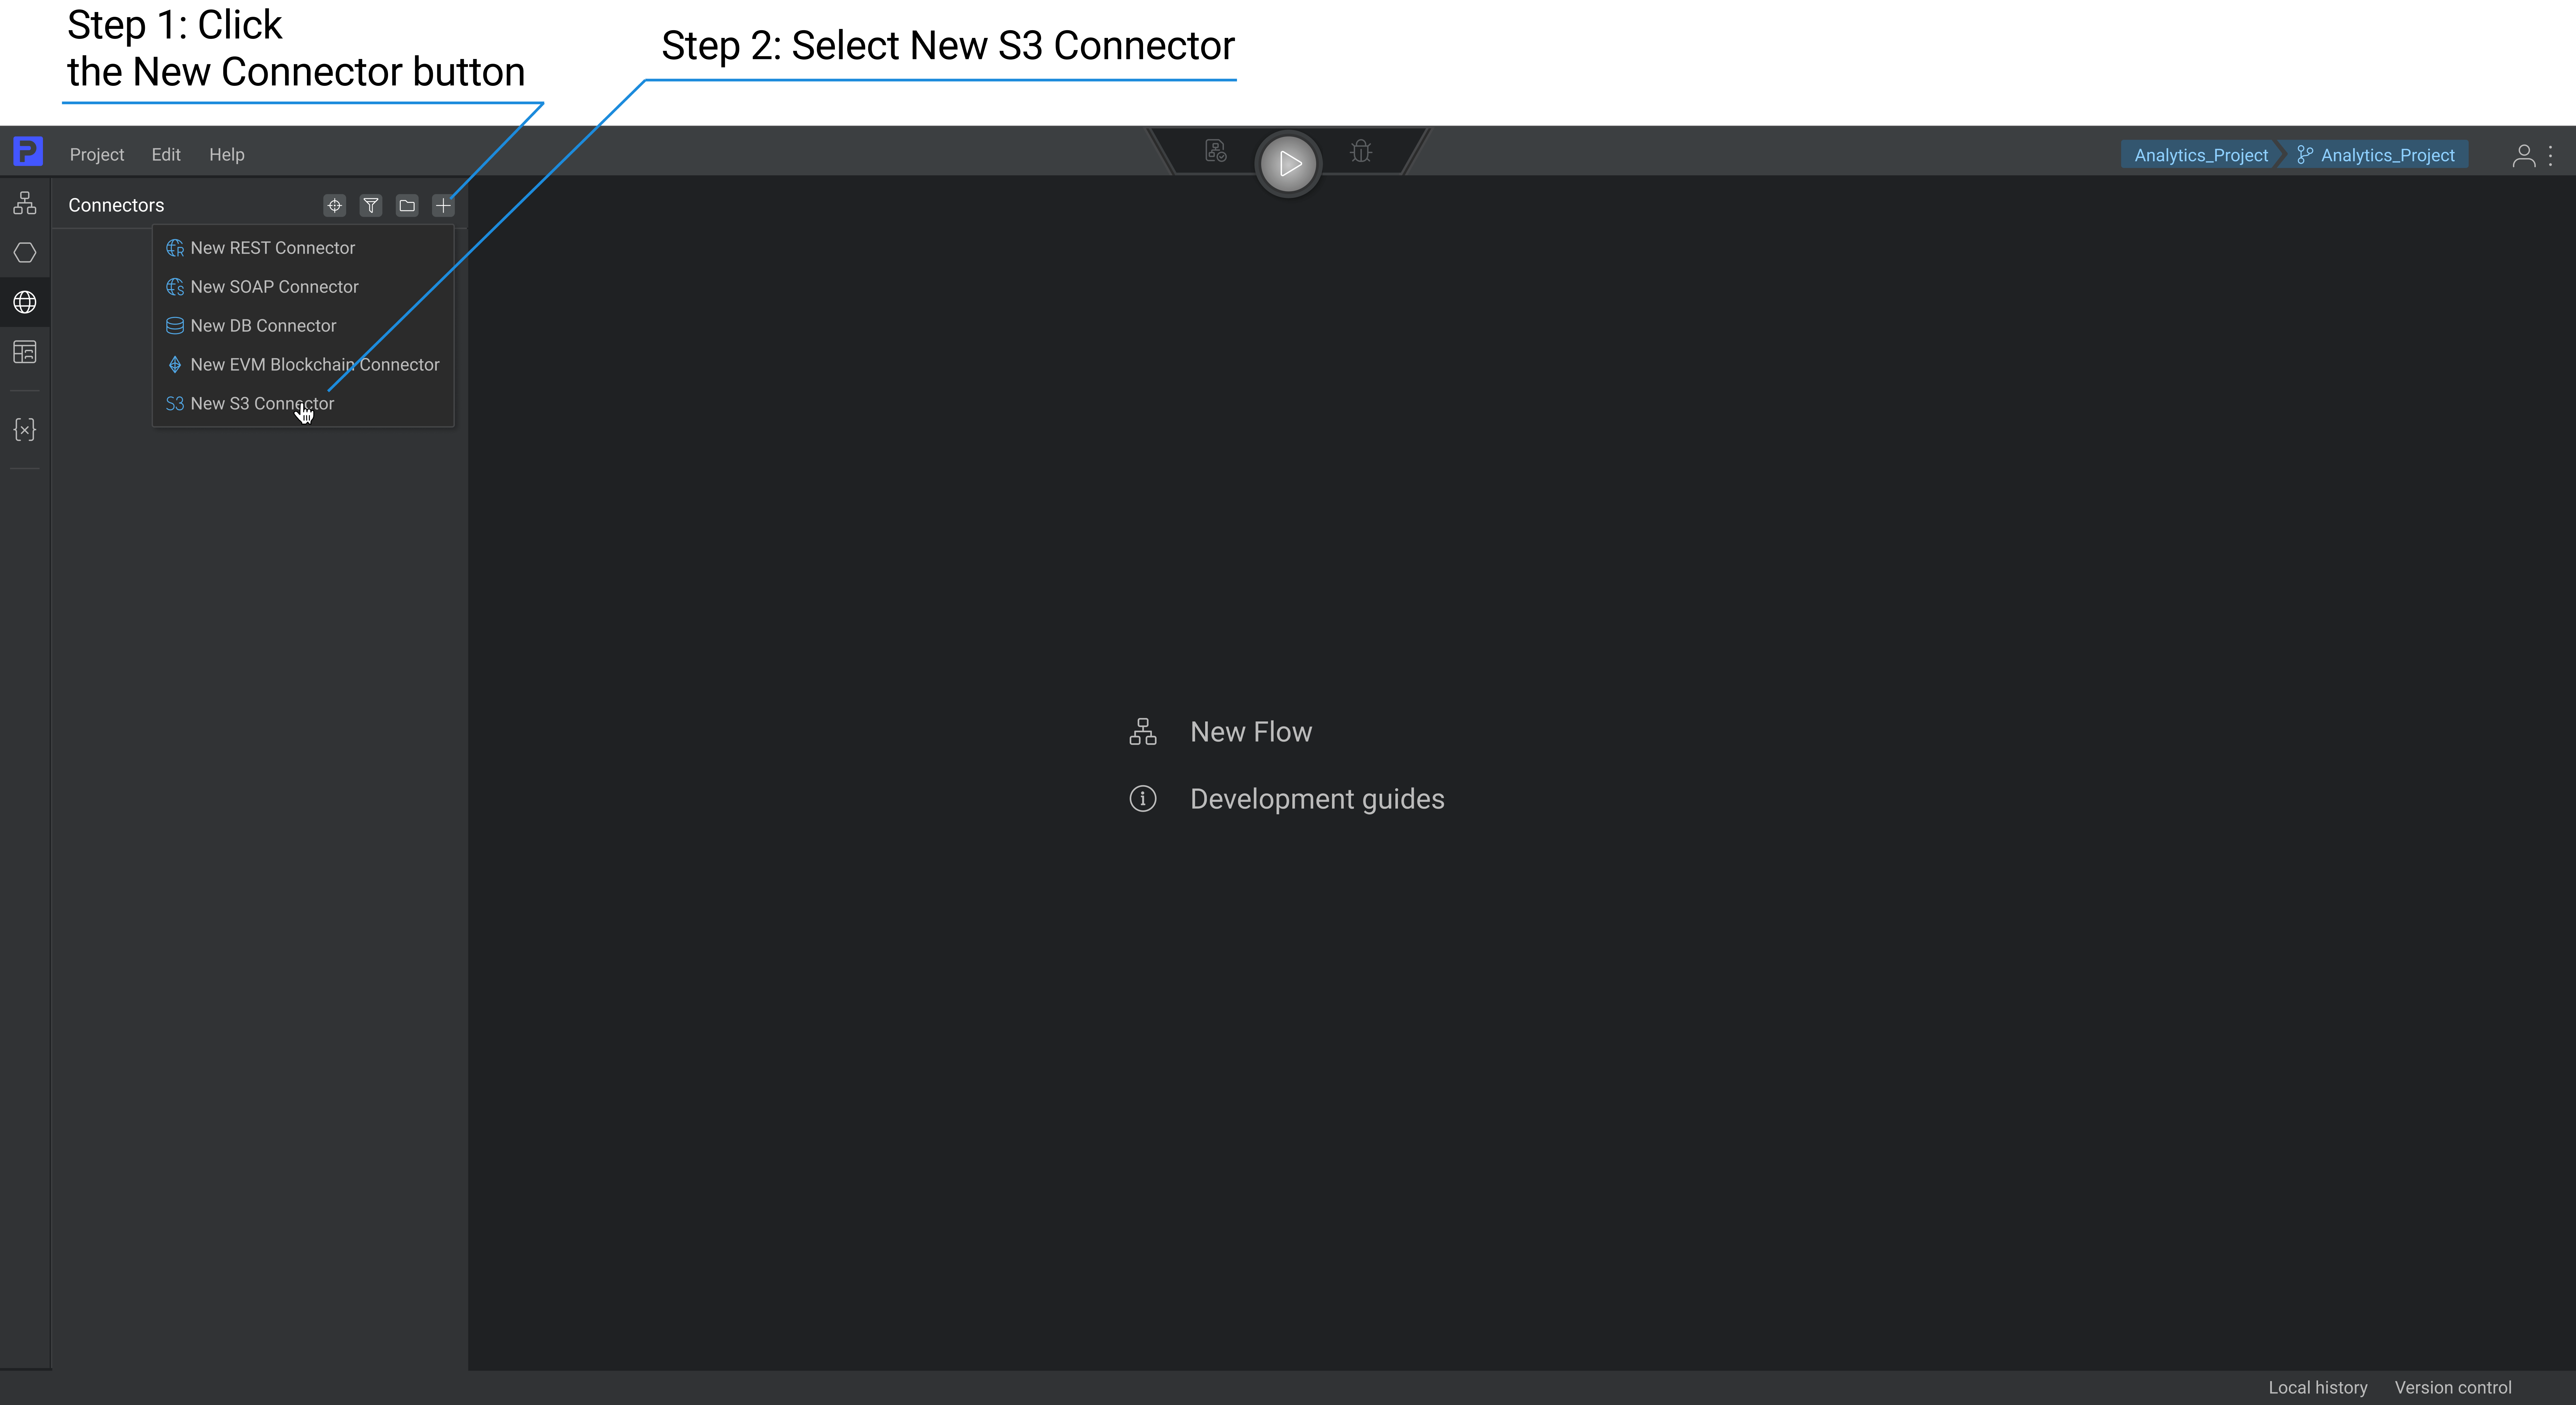
To create a new S3 connector, click the Connector tab 

To create a connector in a folder, you need to select the desired folder and then click on the New Connector button 
In the pop-up window, enter the S3 Connector name and click on the CREATE button.
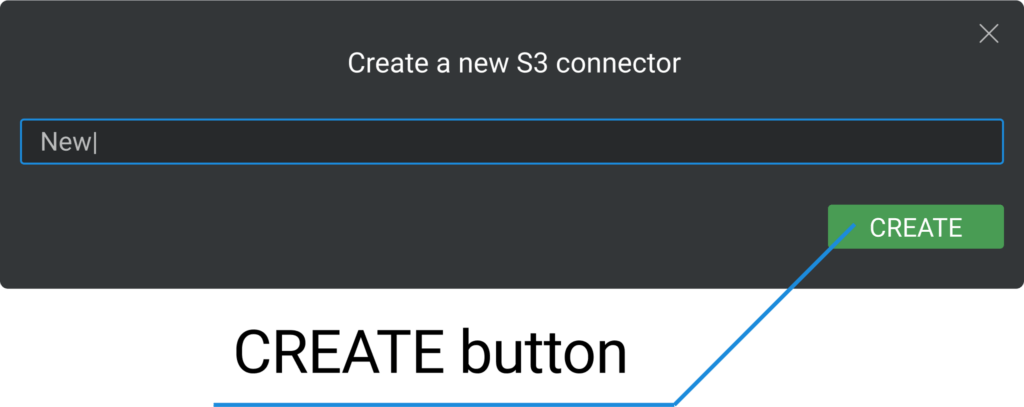
The connector’s name should be longer than 1 symbol but shorter than 100. It can consist of letters (Latin a-z A-Z), numbers 0-9, $, and underscores, and begin with a letter or underscore character.
How to set up an S3 Connector?
After creating an S3 connector, you need to configure it and test the connection.
Select AWS Access Key ID, AWS Secret Access Key, and Region. These field values are chosen from Global variables: AWS Access Key ID and Region from the variables list, and AWS Secret Access Key – passwords.
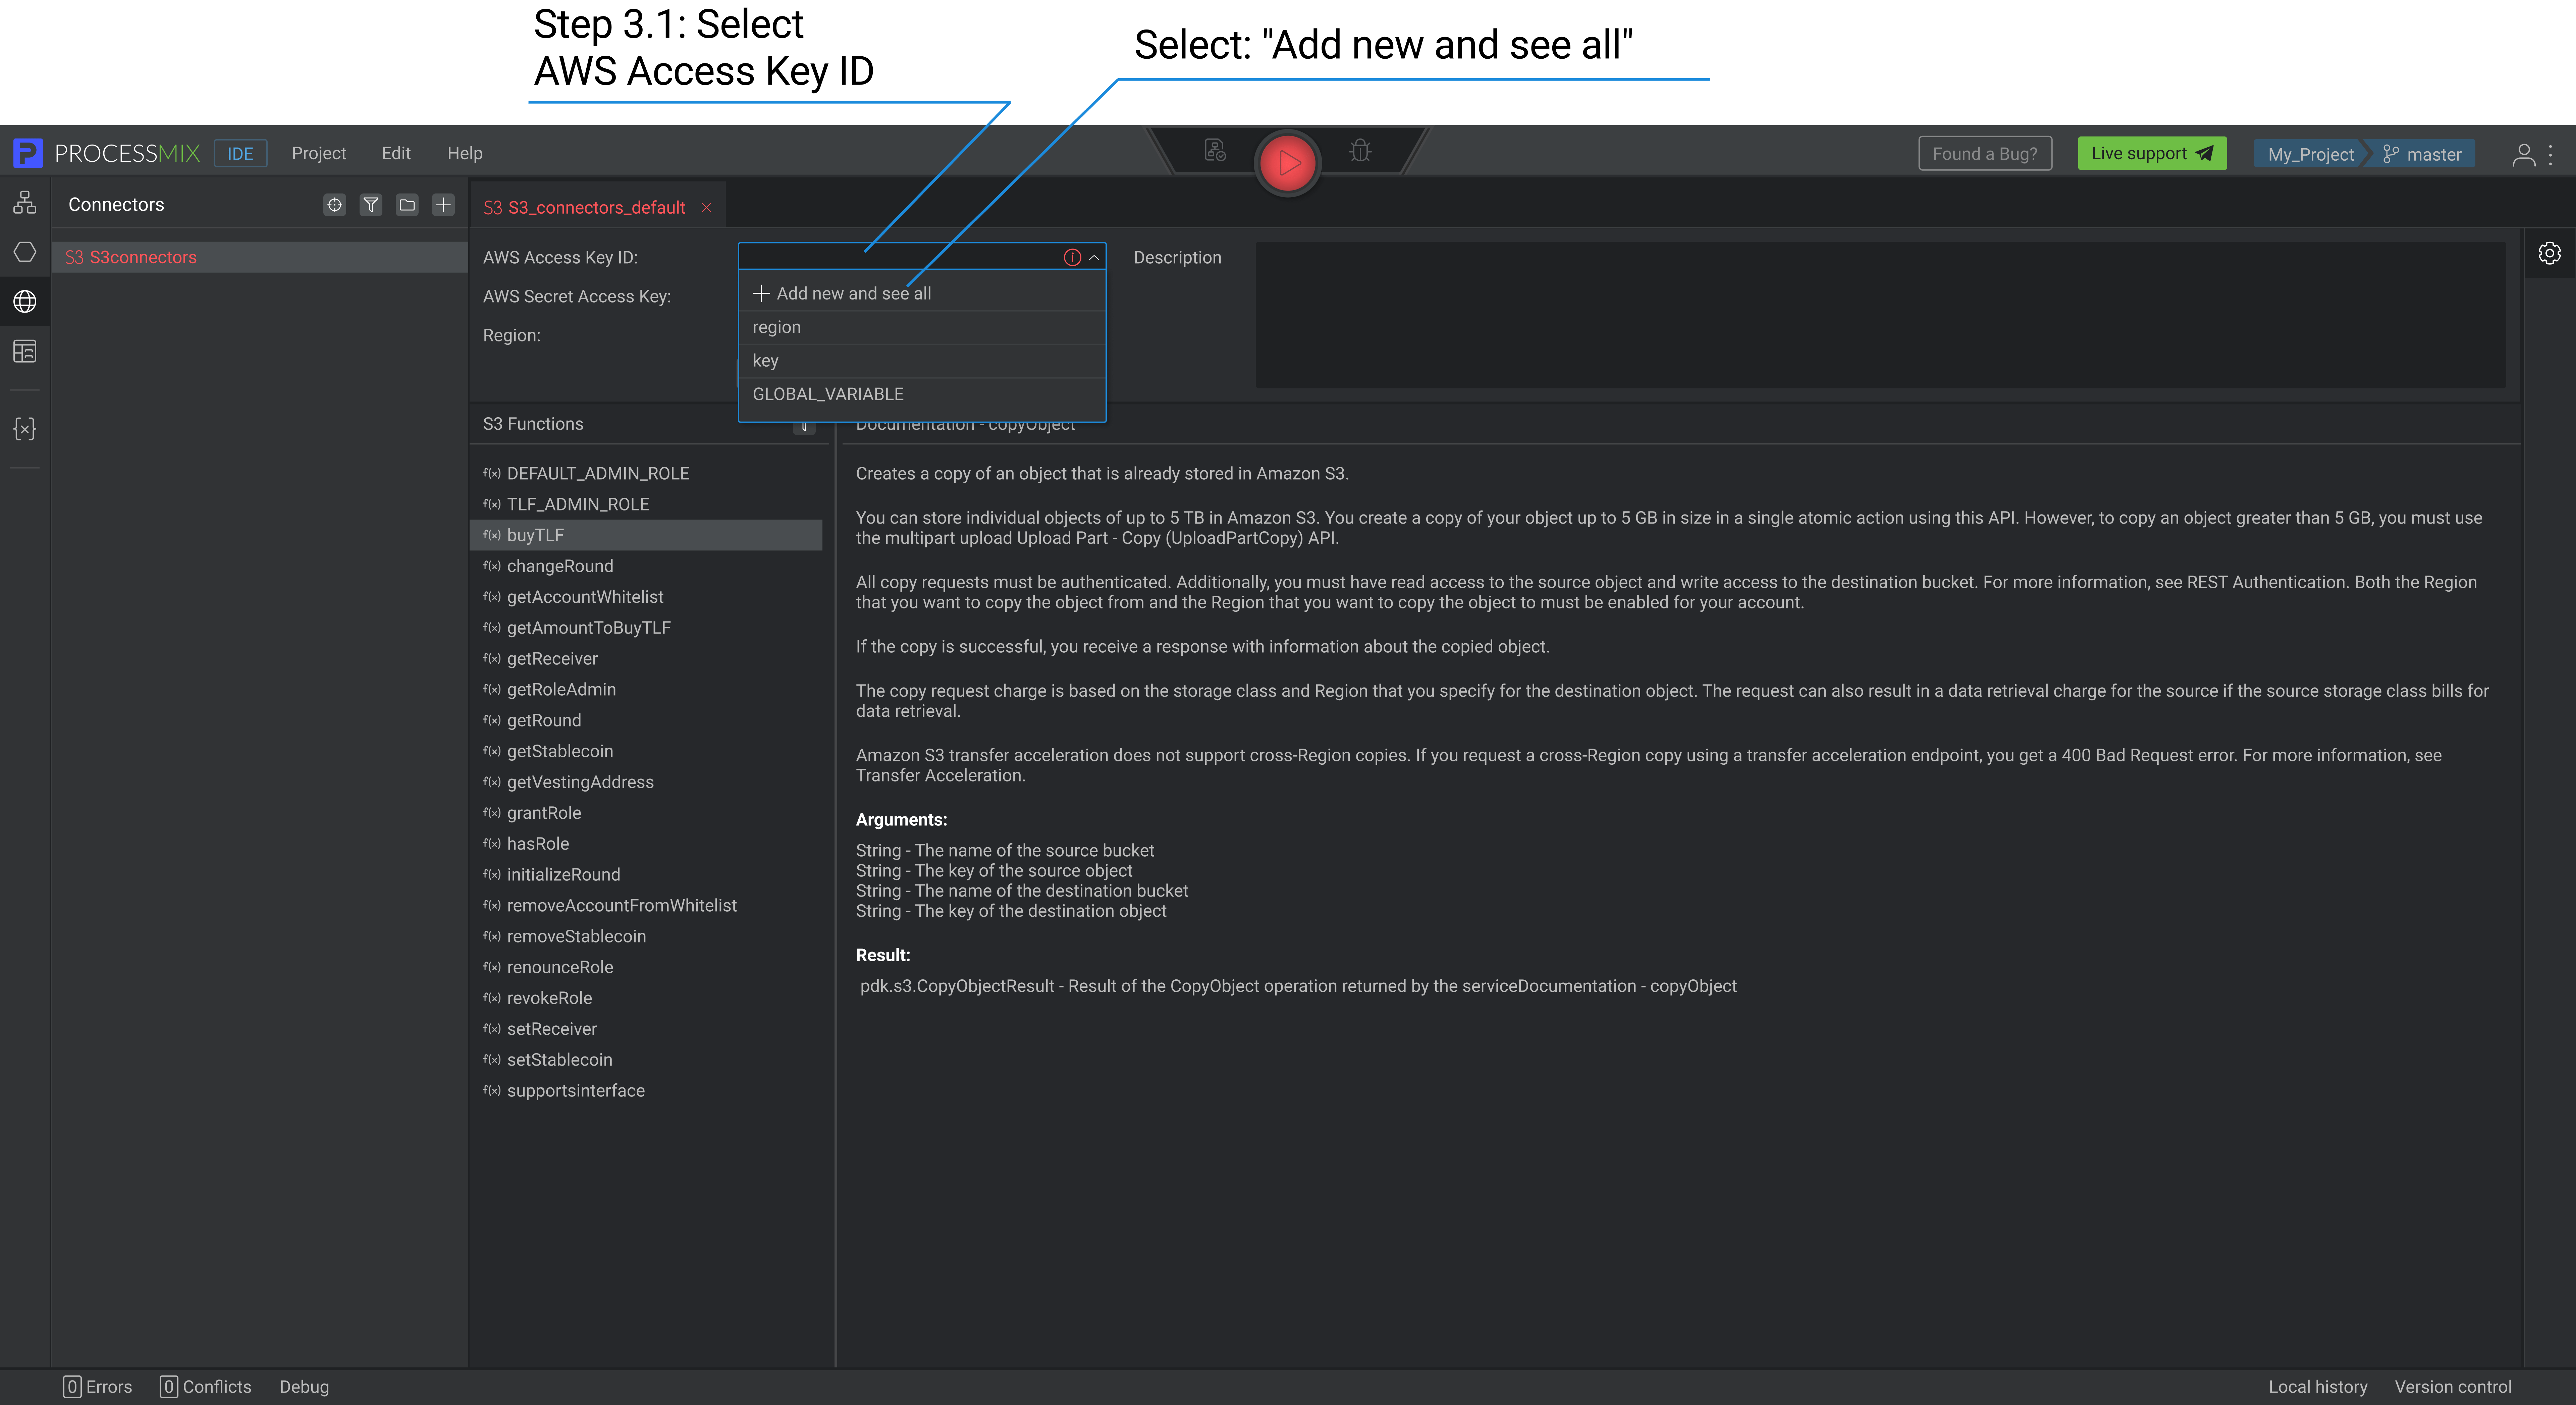
Clicking on the field will display a list containing up to five global variables if they were added through the Global Variables component. Select the name of the required variable or click Add new and see all.
How to select an AWS Access Key ID?
To select an AWS Access Key ID click on the appropriate field and select values from the list. If you want to expand the entire list or add a new variable, click Add new and see all.
To select a variable, click the required name, then click the CONFIRM button.
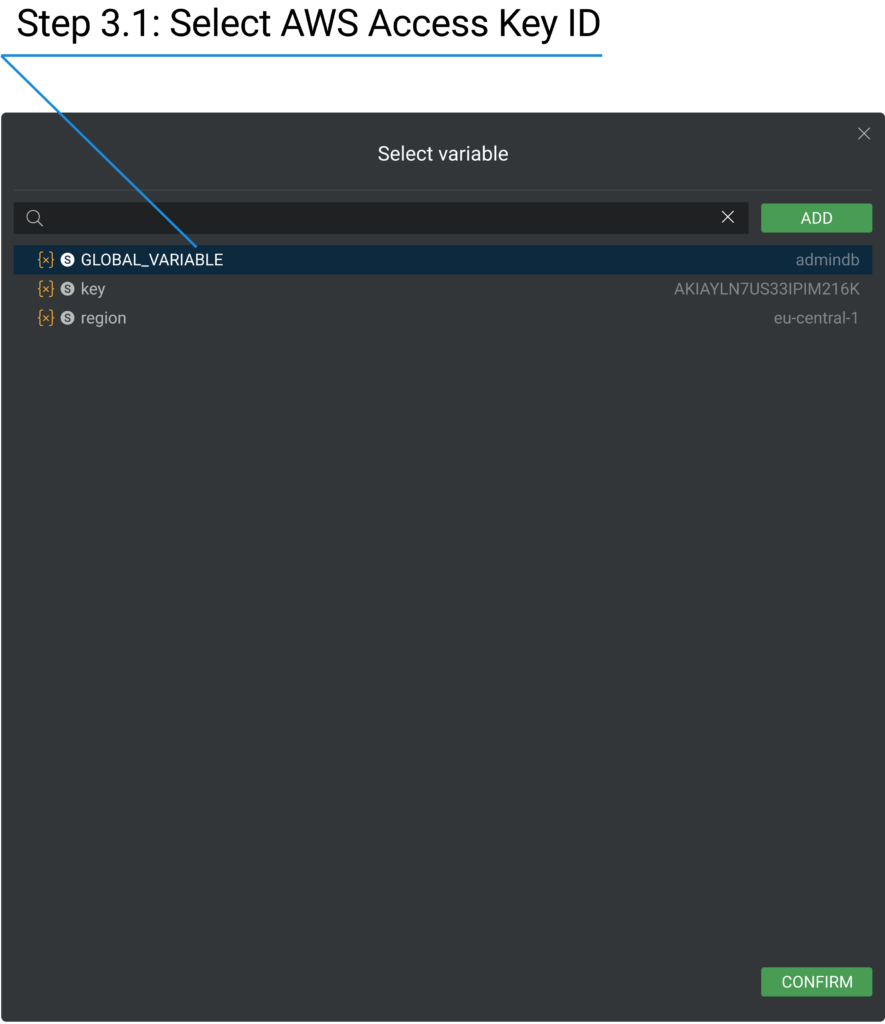
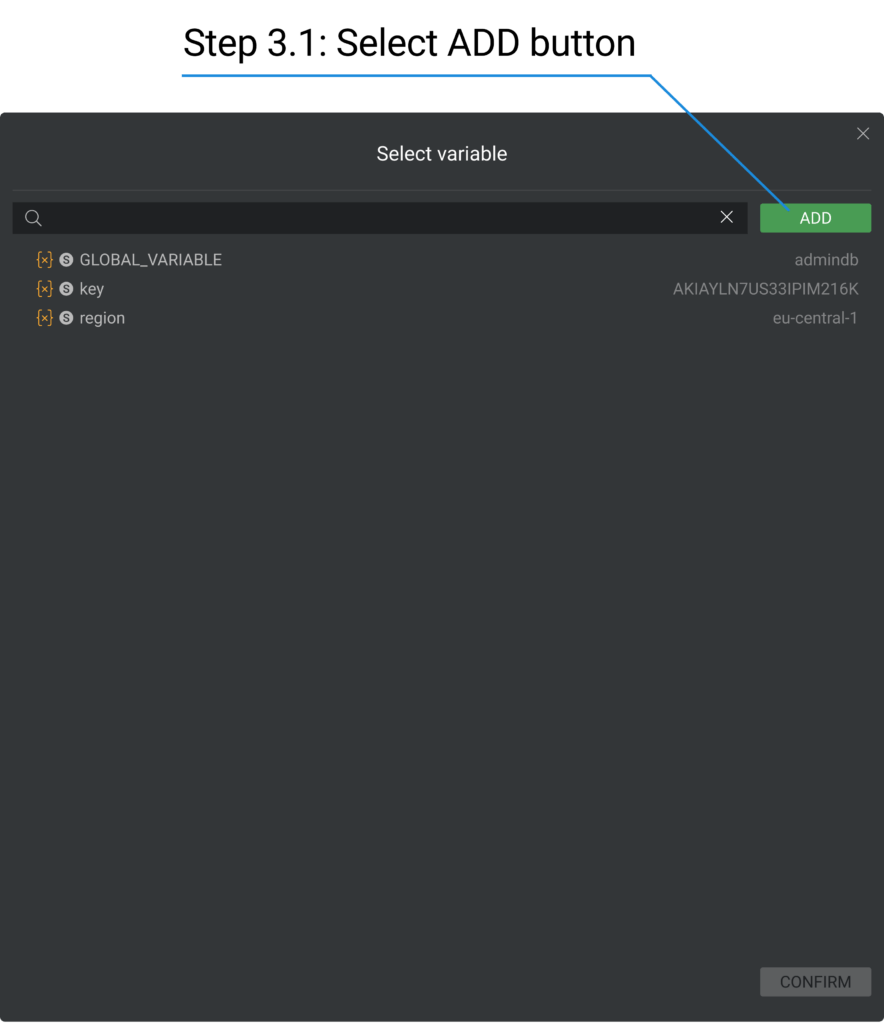
If the required global variable is not in the drop-down list, click Add new and See all. In the Select Variable pop-up window, click on the ADD button.
Input the Name and Value of a new variable, and change a type if necessary. Then, click the ADD button.
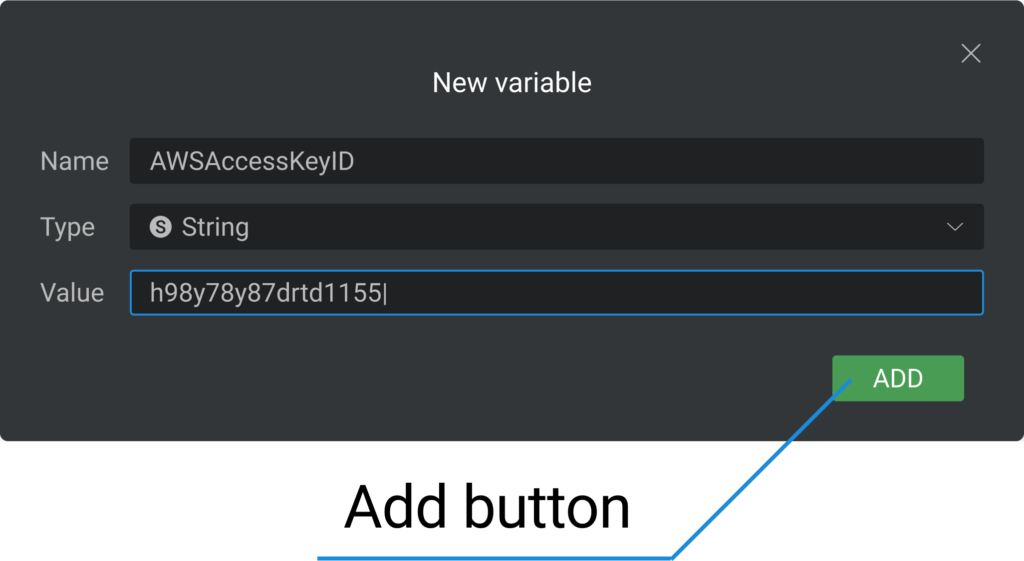
All fields are required.
The Variable’s name should be longer than 1 symbol and shorter than 255. It can contain letters (Latin a-z A-Z), numbers 0-9, $, and underscores, beginning from a letter or an underscore character.
Value (String type) should be longer than 1 symbol and shorter than 2000.
Value (Integer type) should be longer than 1 symbol and shorter than 20. Only numbers and minuses are allowed.
Value (Float type) should be longer than 1 symbol and shorter than 255. Only numbers, points, and minuses are allowed.
How to select an AWS Secret Key?
To select the AWS Secret Key, click the appropriate field and select values from the list. If you want to expand the entire list or add a new variable, click Add new and see all.
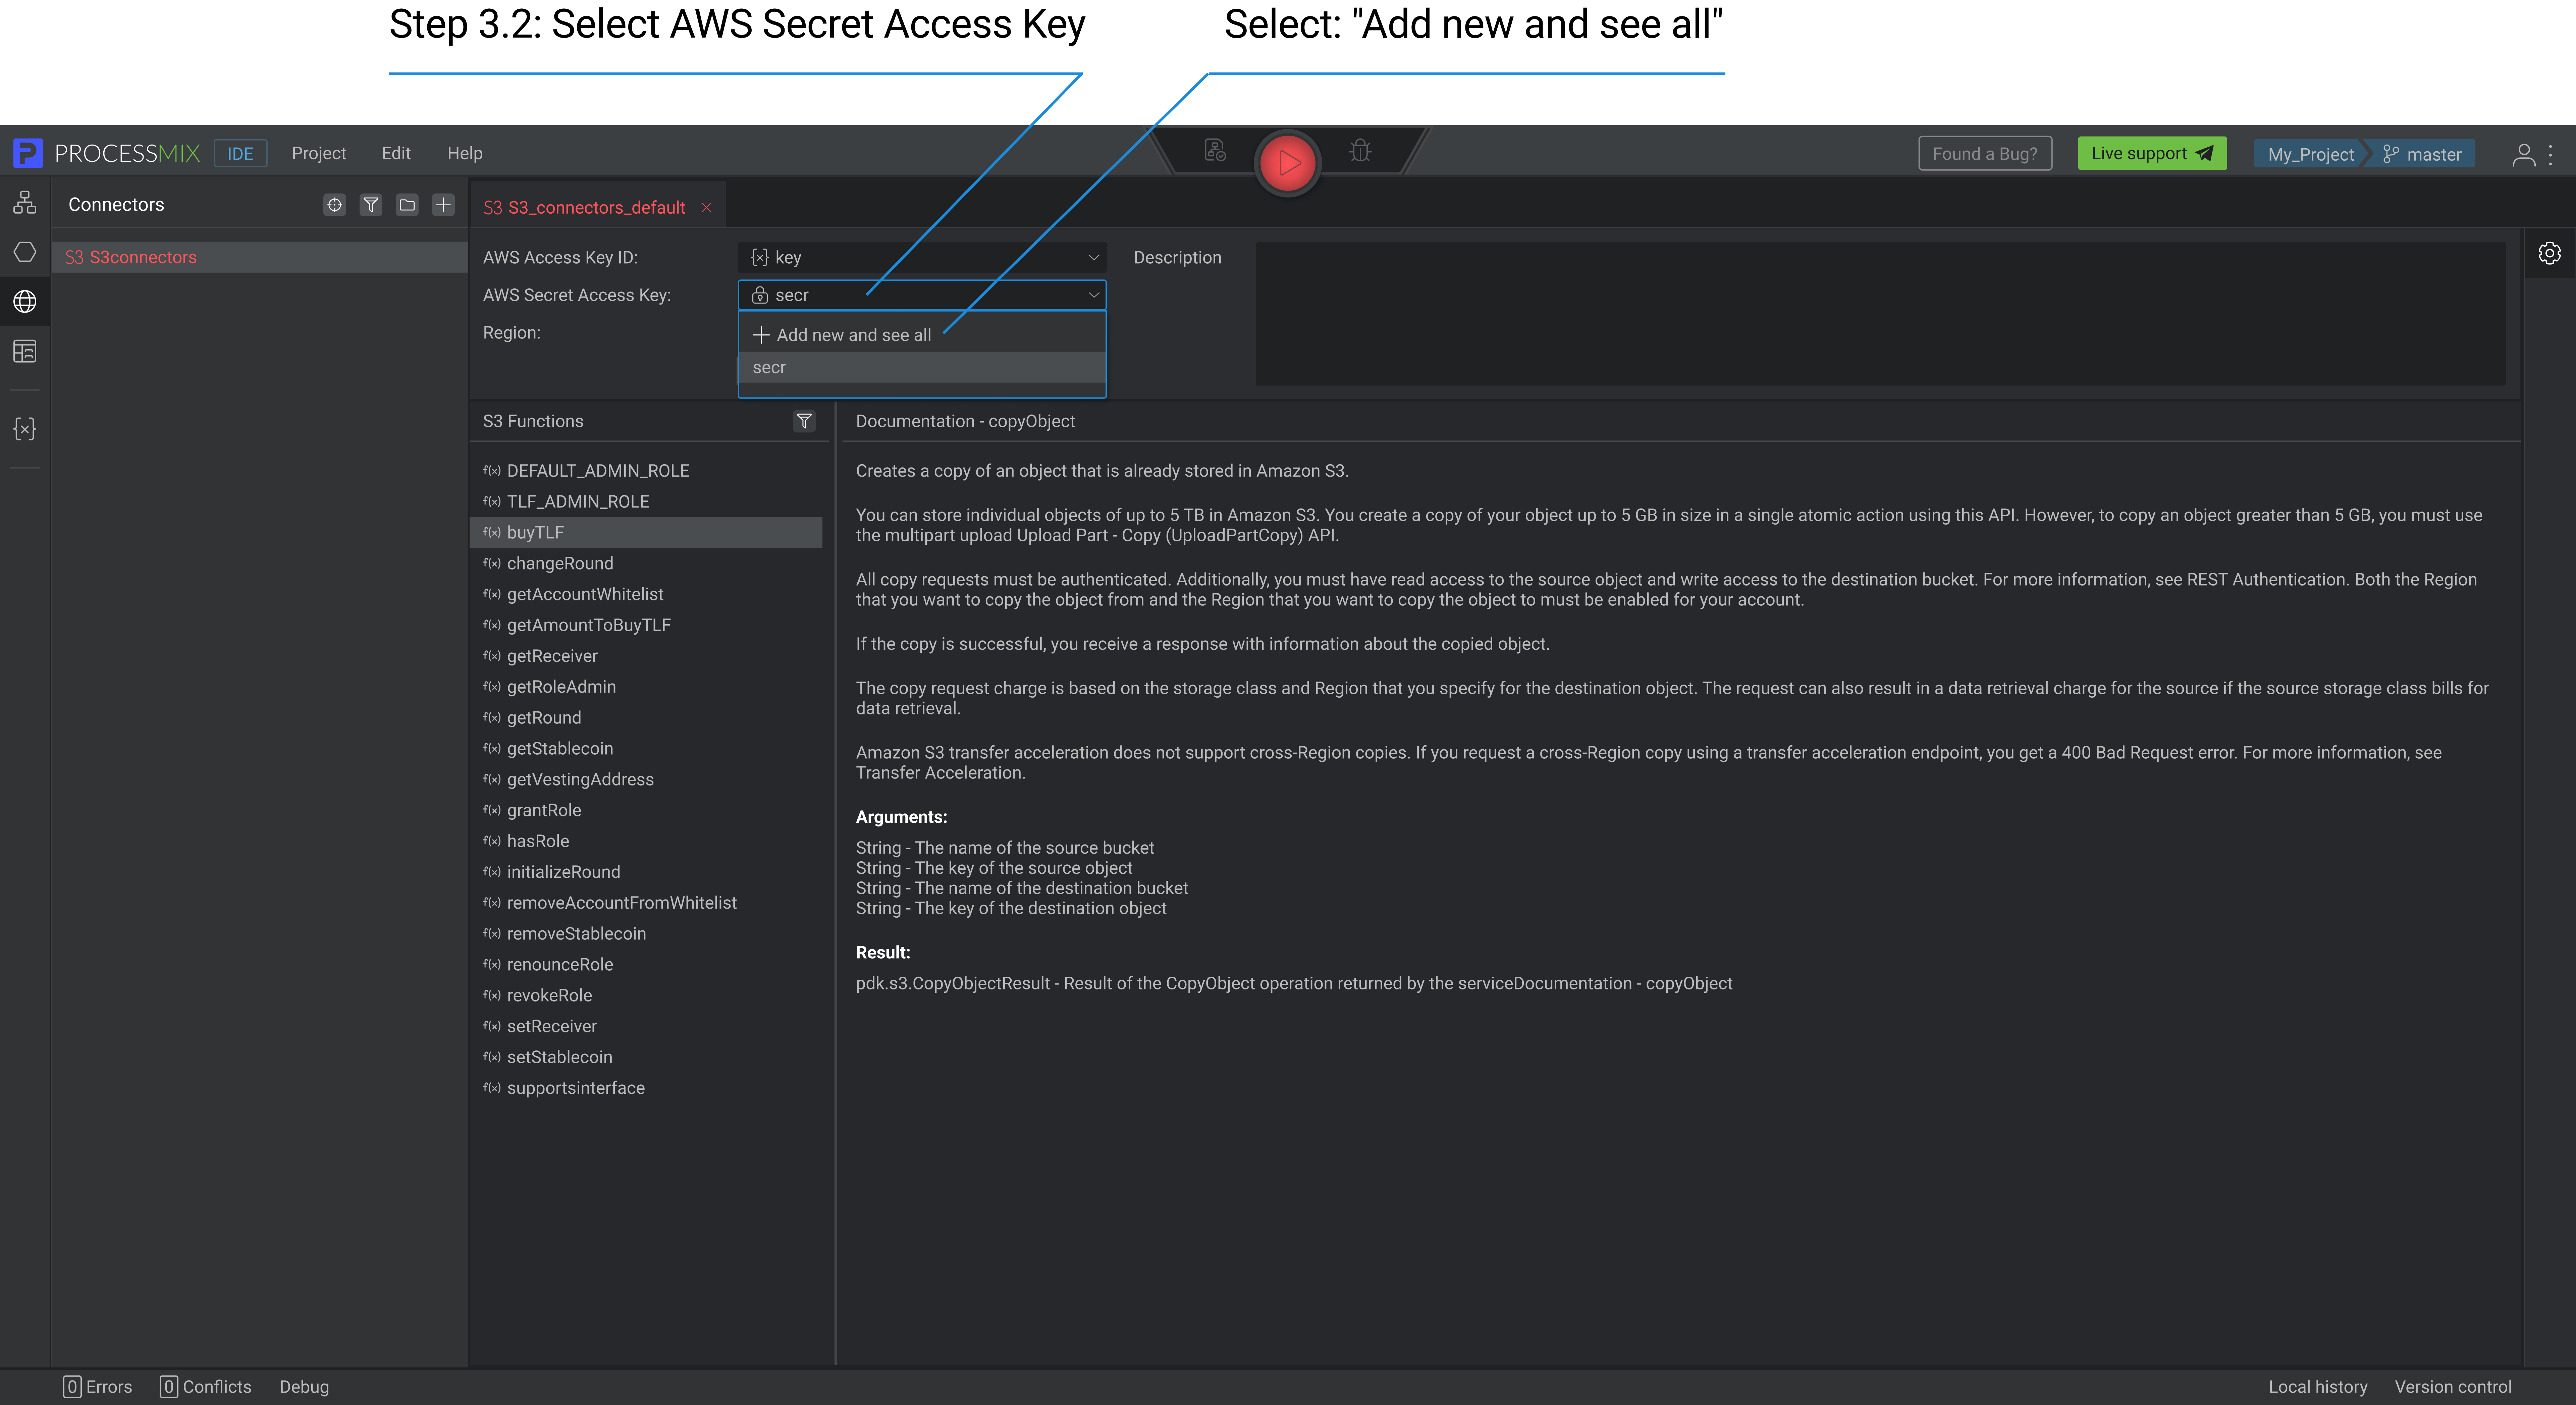
To select a variable, click the required name, then click the CONFIRM button.
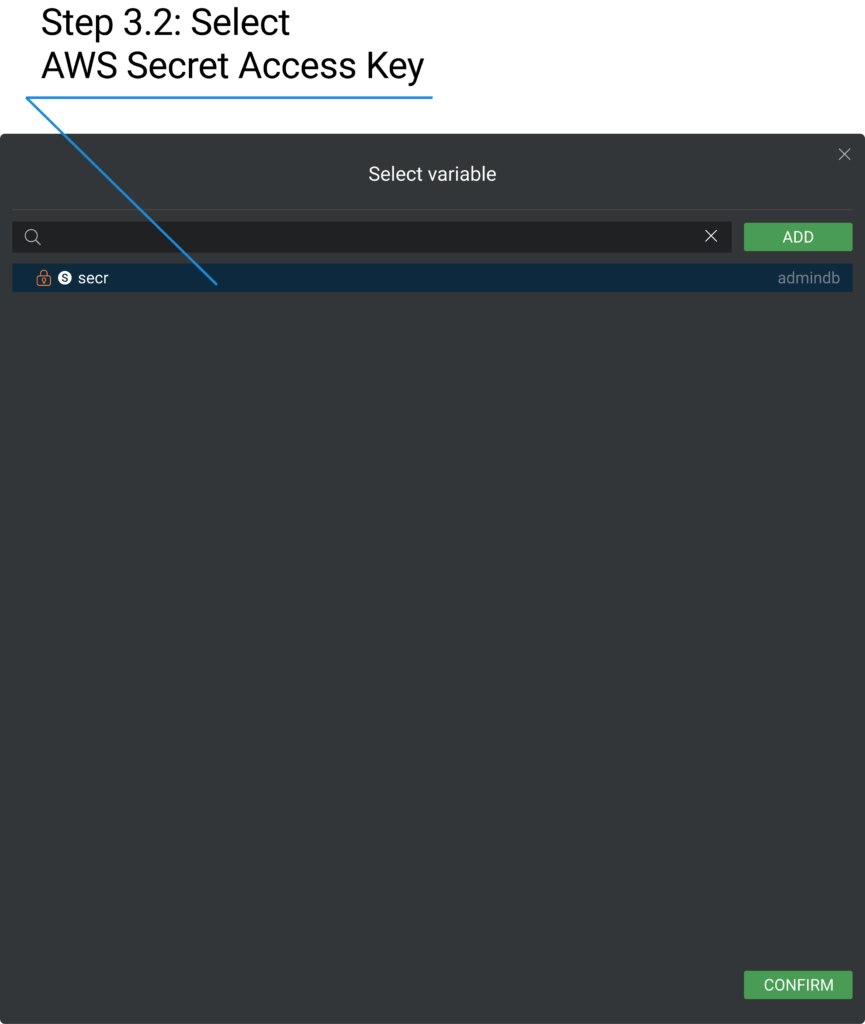
If the required global variable is not in the drop-down list, click Add new and See all. In the Select Variable pop-up window, click on the ADD button.
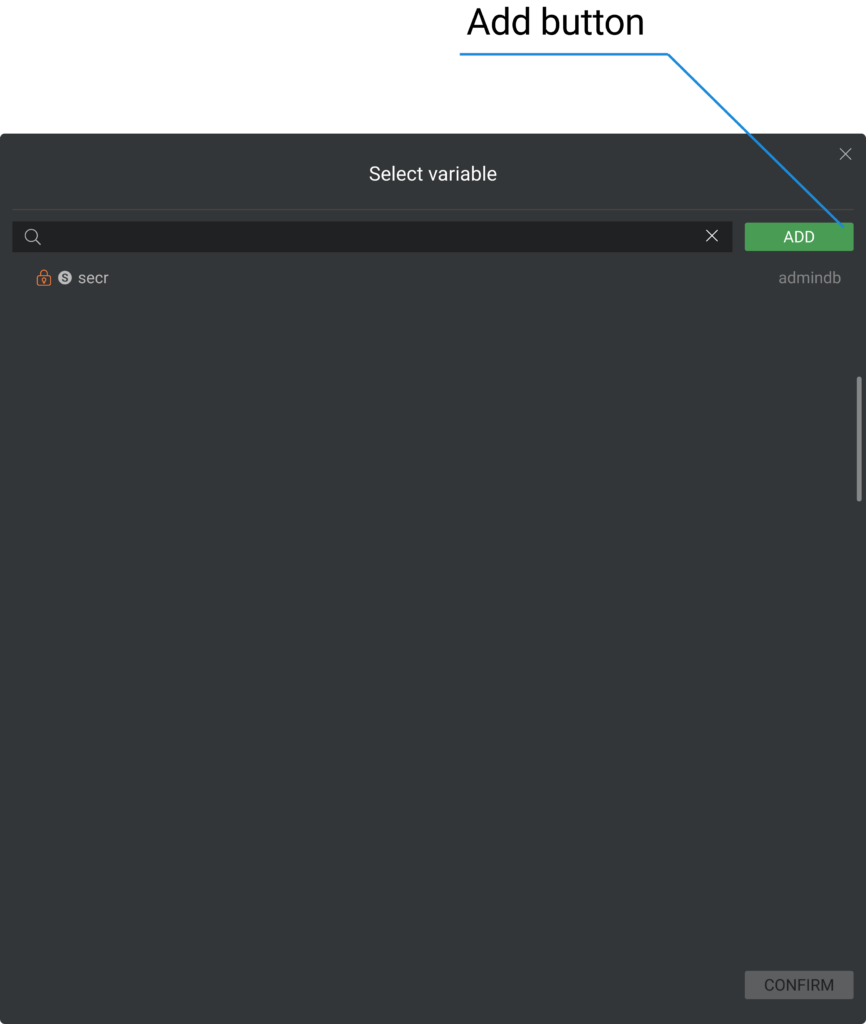
Enter the Name and Value of a new password, then click the ADD button.
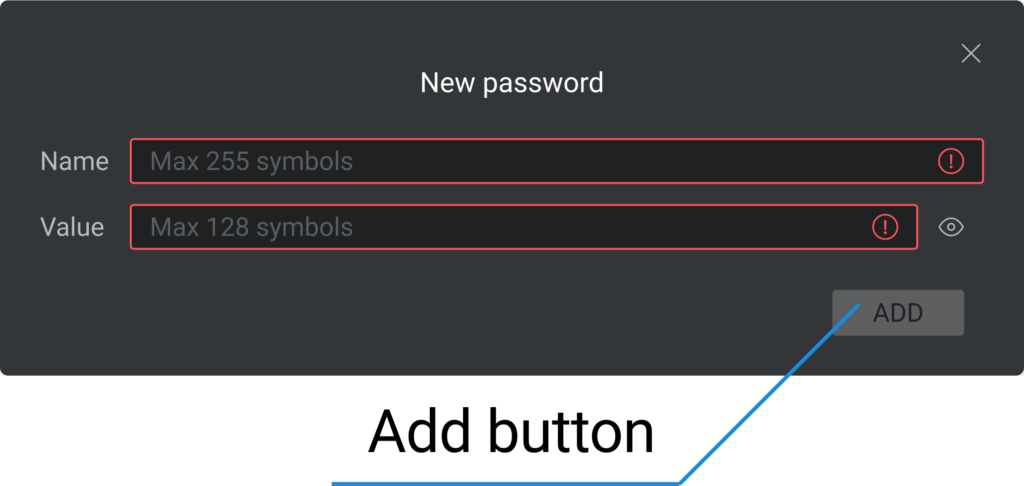
All fields are required.
The Variable’s name should be longer than 1 symbol and shorter than 255. It can contain letters (Latin a-z A-Z), numbers 0-9, $, and an underscores, beginning from a letter or underscore character.
Value should be longer than 1 symbol and shorter than 255. Only numbers, points, and minuses are allowed.
How to select a Region?
To select the Region, click the appropriate field and select values from the list. If you want to expand the entire list or add a new variable, click Add new and see all.
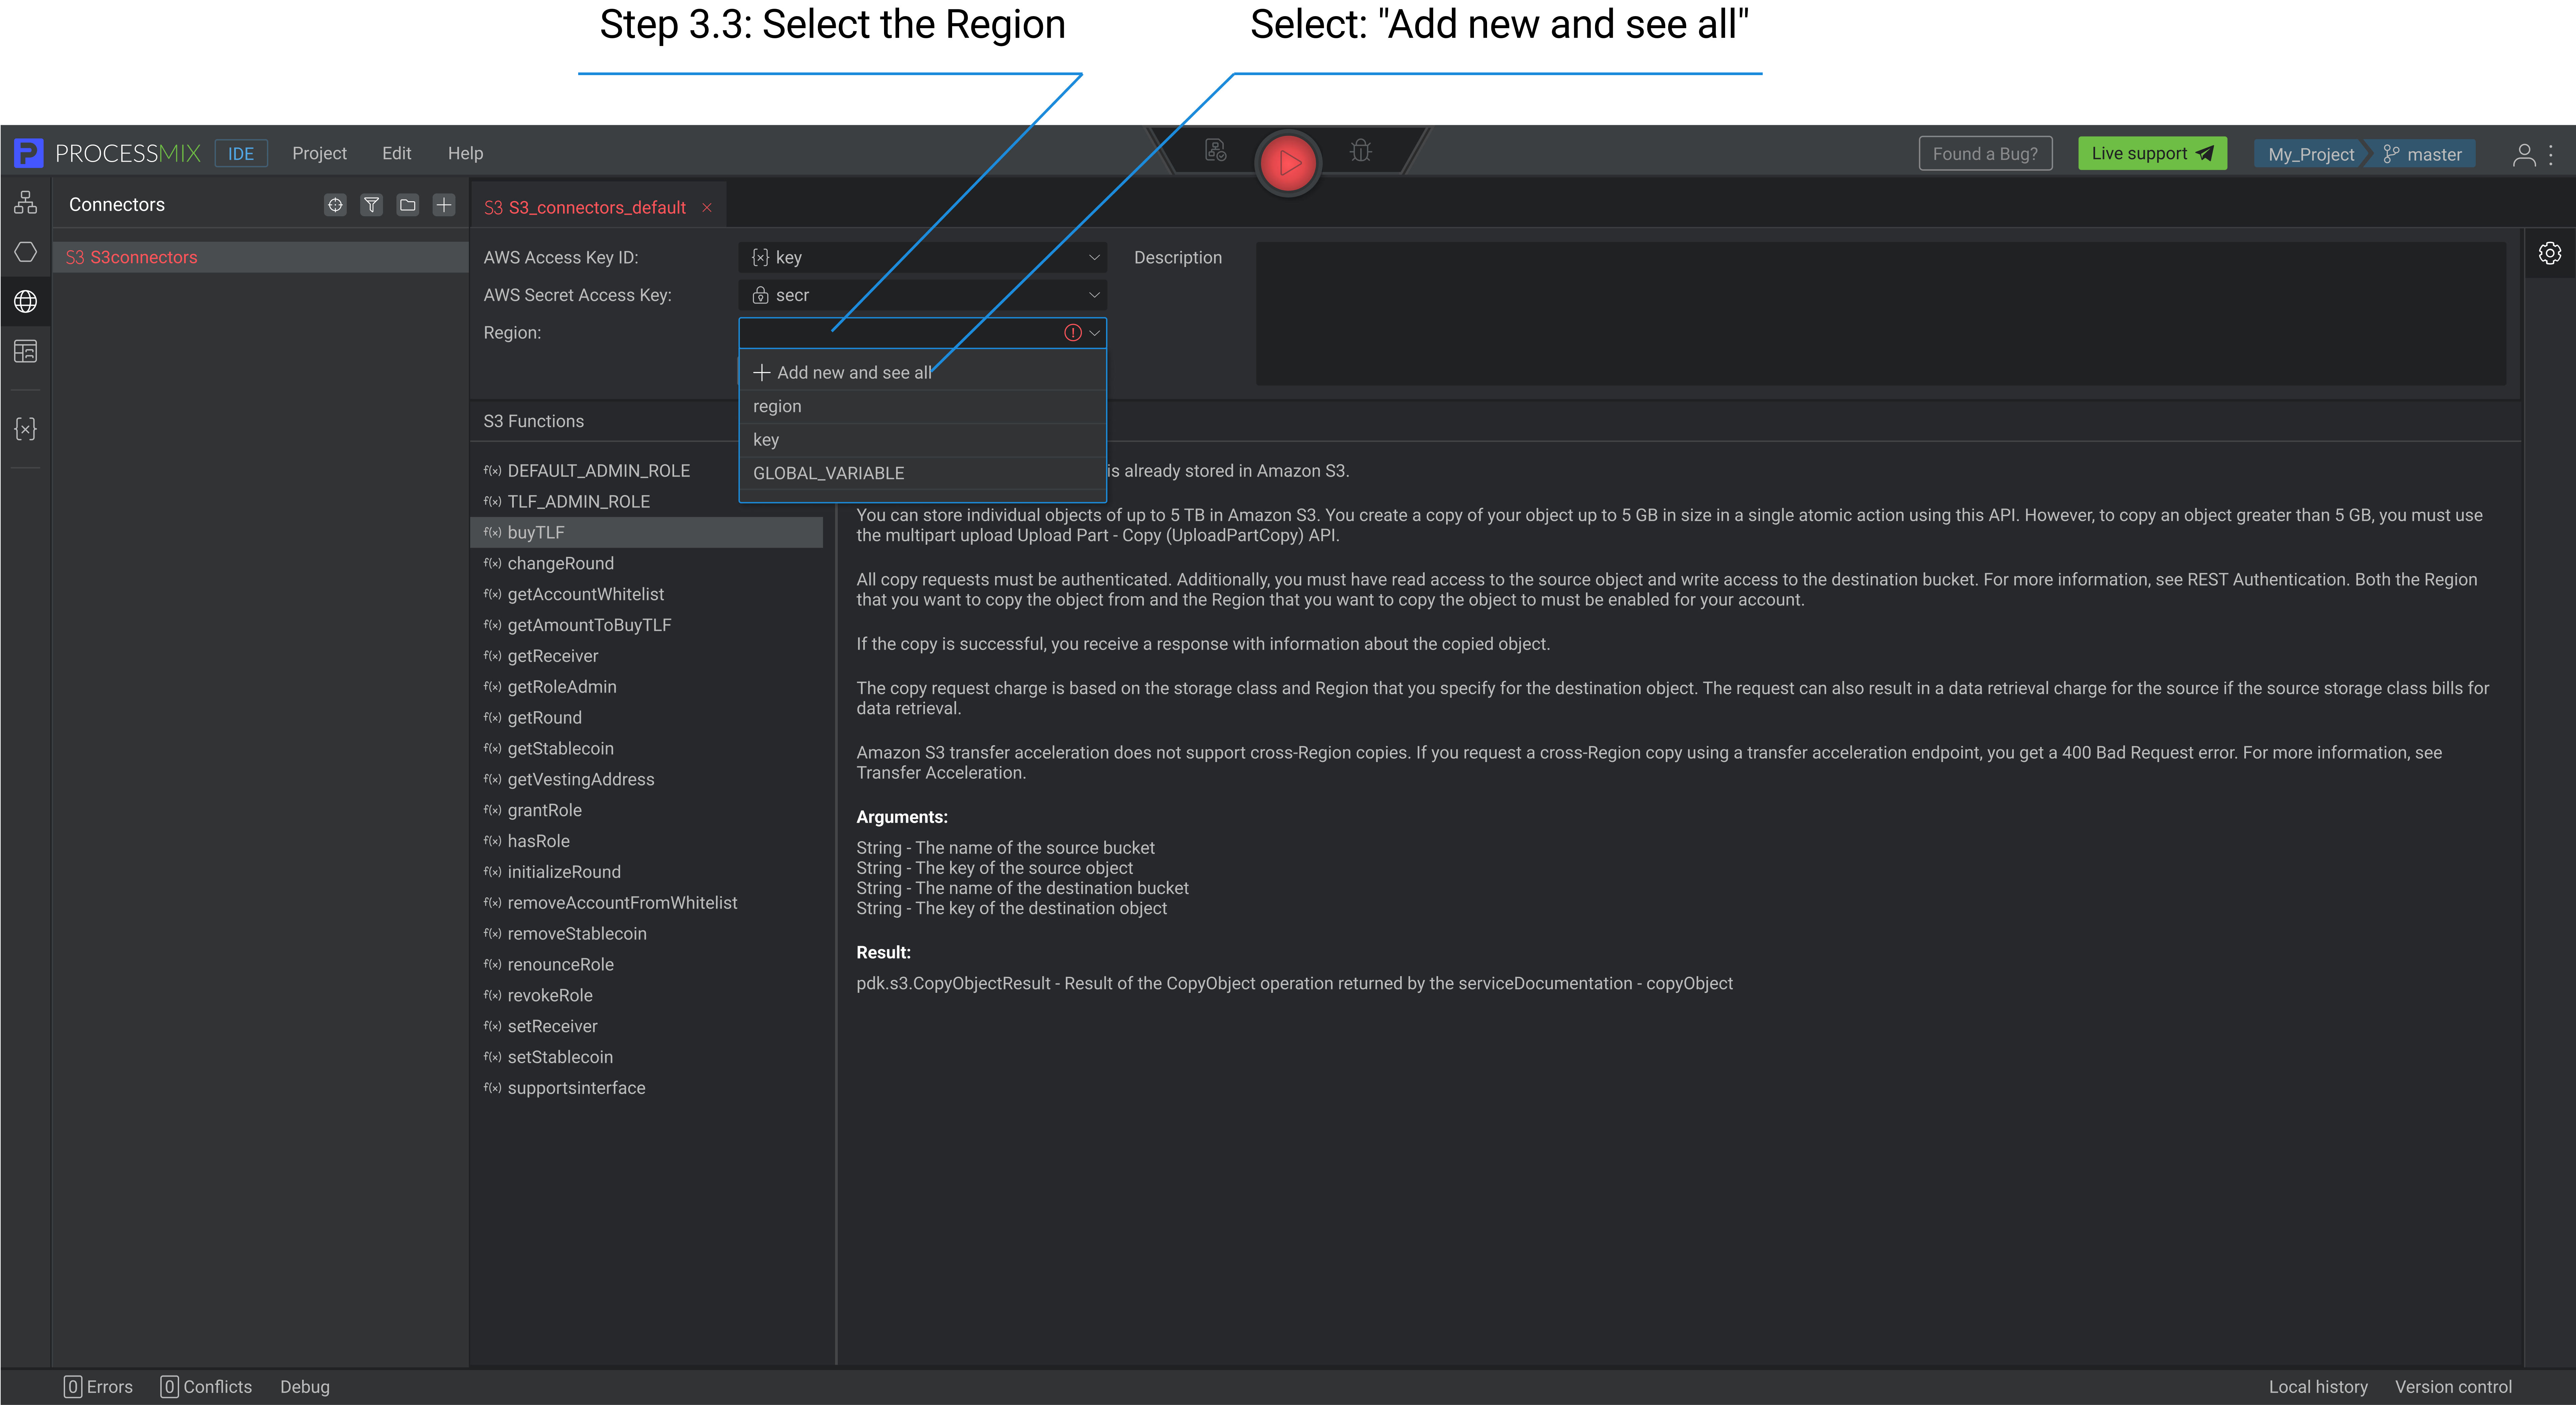
To select a variable, click the required name, then click the CONFIRM button.
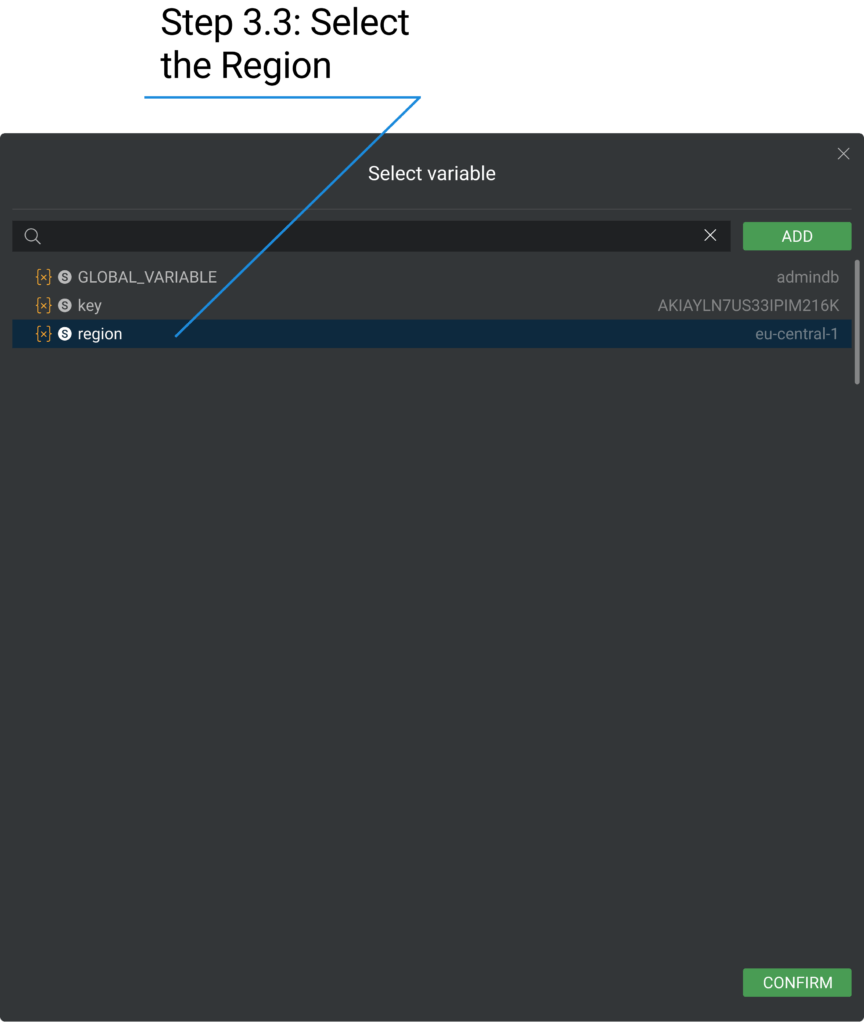
If you have not saved the needed value, select the first item of the list Add new or view all. Then, to add a new variable click the ADD button.
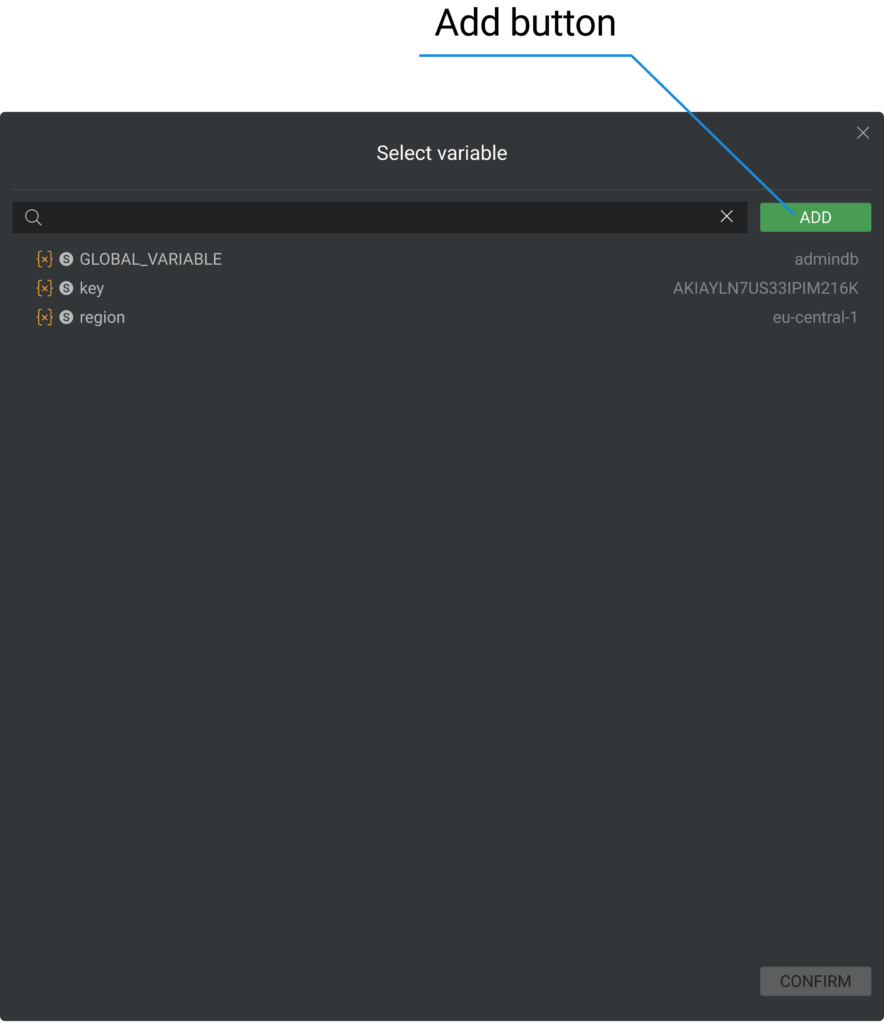
The ADD button will only become available once all the necessary field values have been entered. Input the Name and select the Value of a new variable. Then, click the ADD button.
You can only select a region from the list. The list includes the regions provided by Amazon.
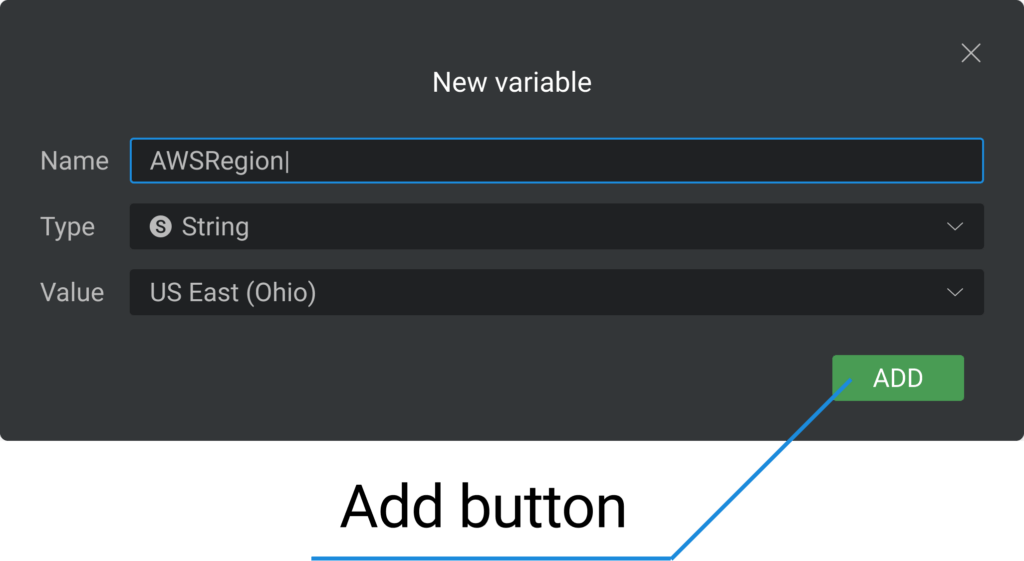
All fields are required.
The Variable’s name should be longer than 1 symbol and shorter than 255. It can contain letters (Latin a-z A-Z), numbers 0-9, $, and underscores, beginning from a letter or underscore character.
How to check the connection?
To establish a connection, follow steps 3.1-3.3 to input the AWS Access Key ID, AWS Secret Access Key, and Region. Then click the CHECK CONNECTION button. If the connection is established successfully, the status “Connected” will be displayed in green. If an error occurs, the error will be displayed in red. If the connection isn’t established, please verify the data you entered and try again.
Description
In the field we can describe the connector, the description is not a required field. To add a Description to the S3 Connector. Click on the Description section and enter the value.
The Description should be shorter than 2000 symbols.
Connector functions
On the connector page, you can view a list of functions and their documentation. Double-click a function to see its documentation on the right.
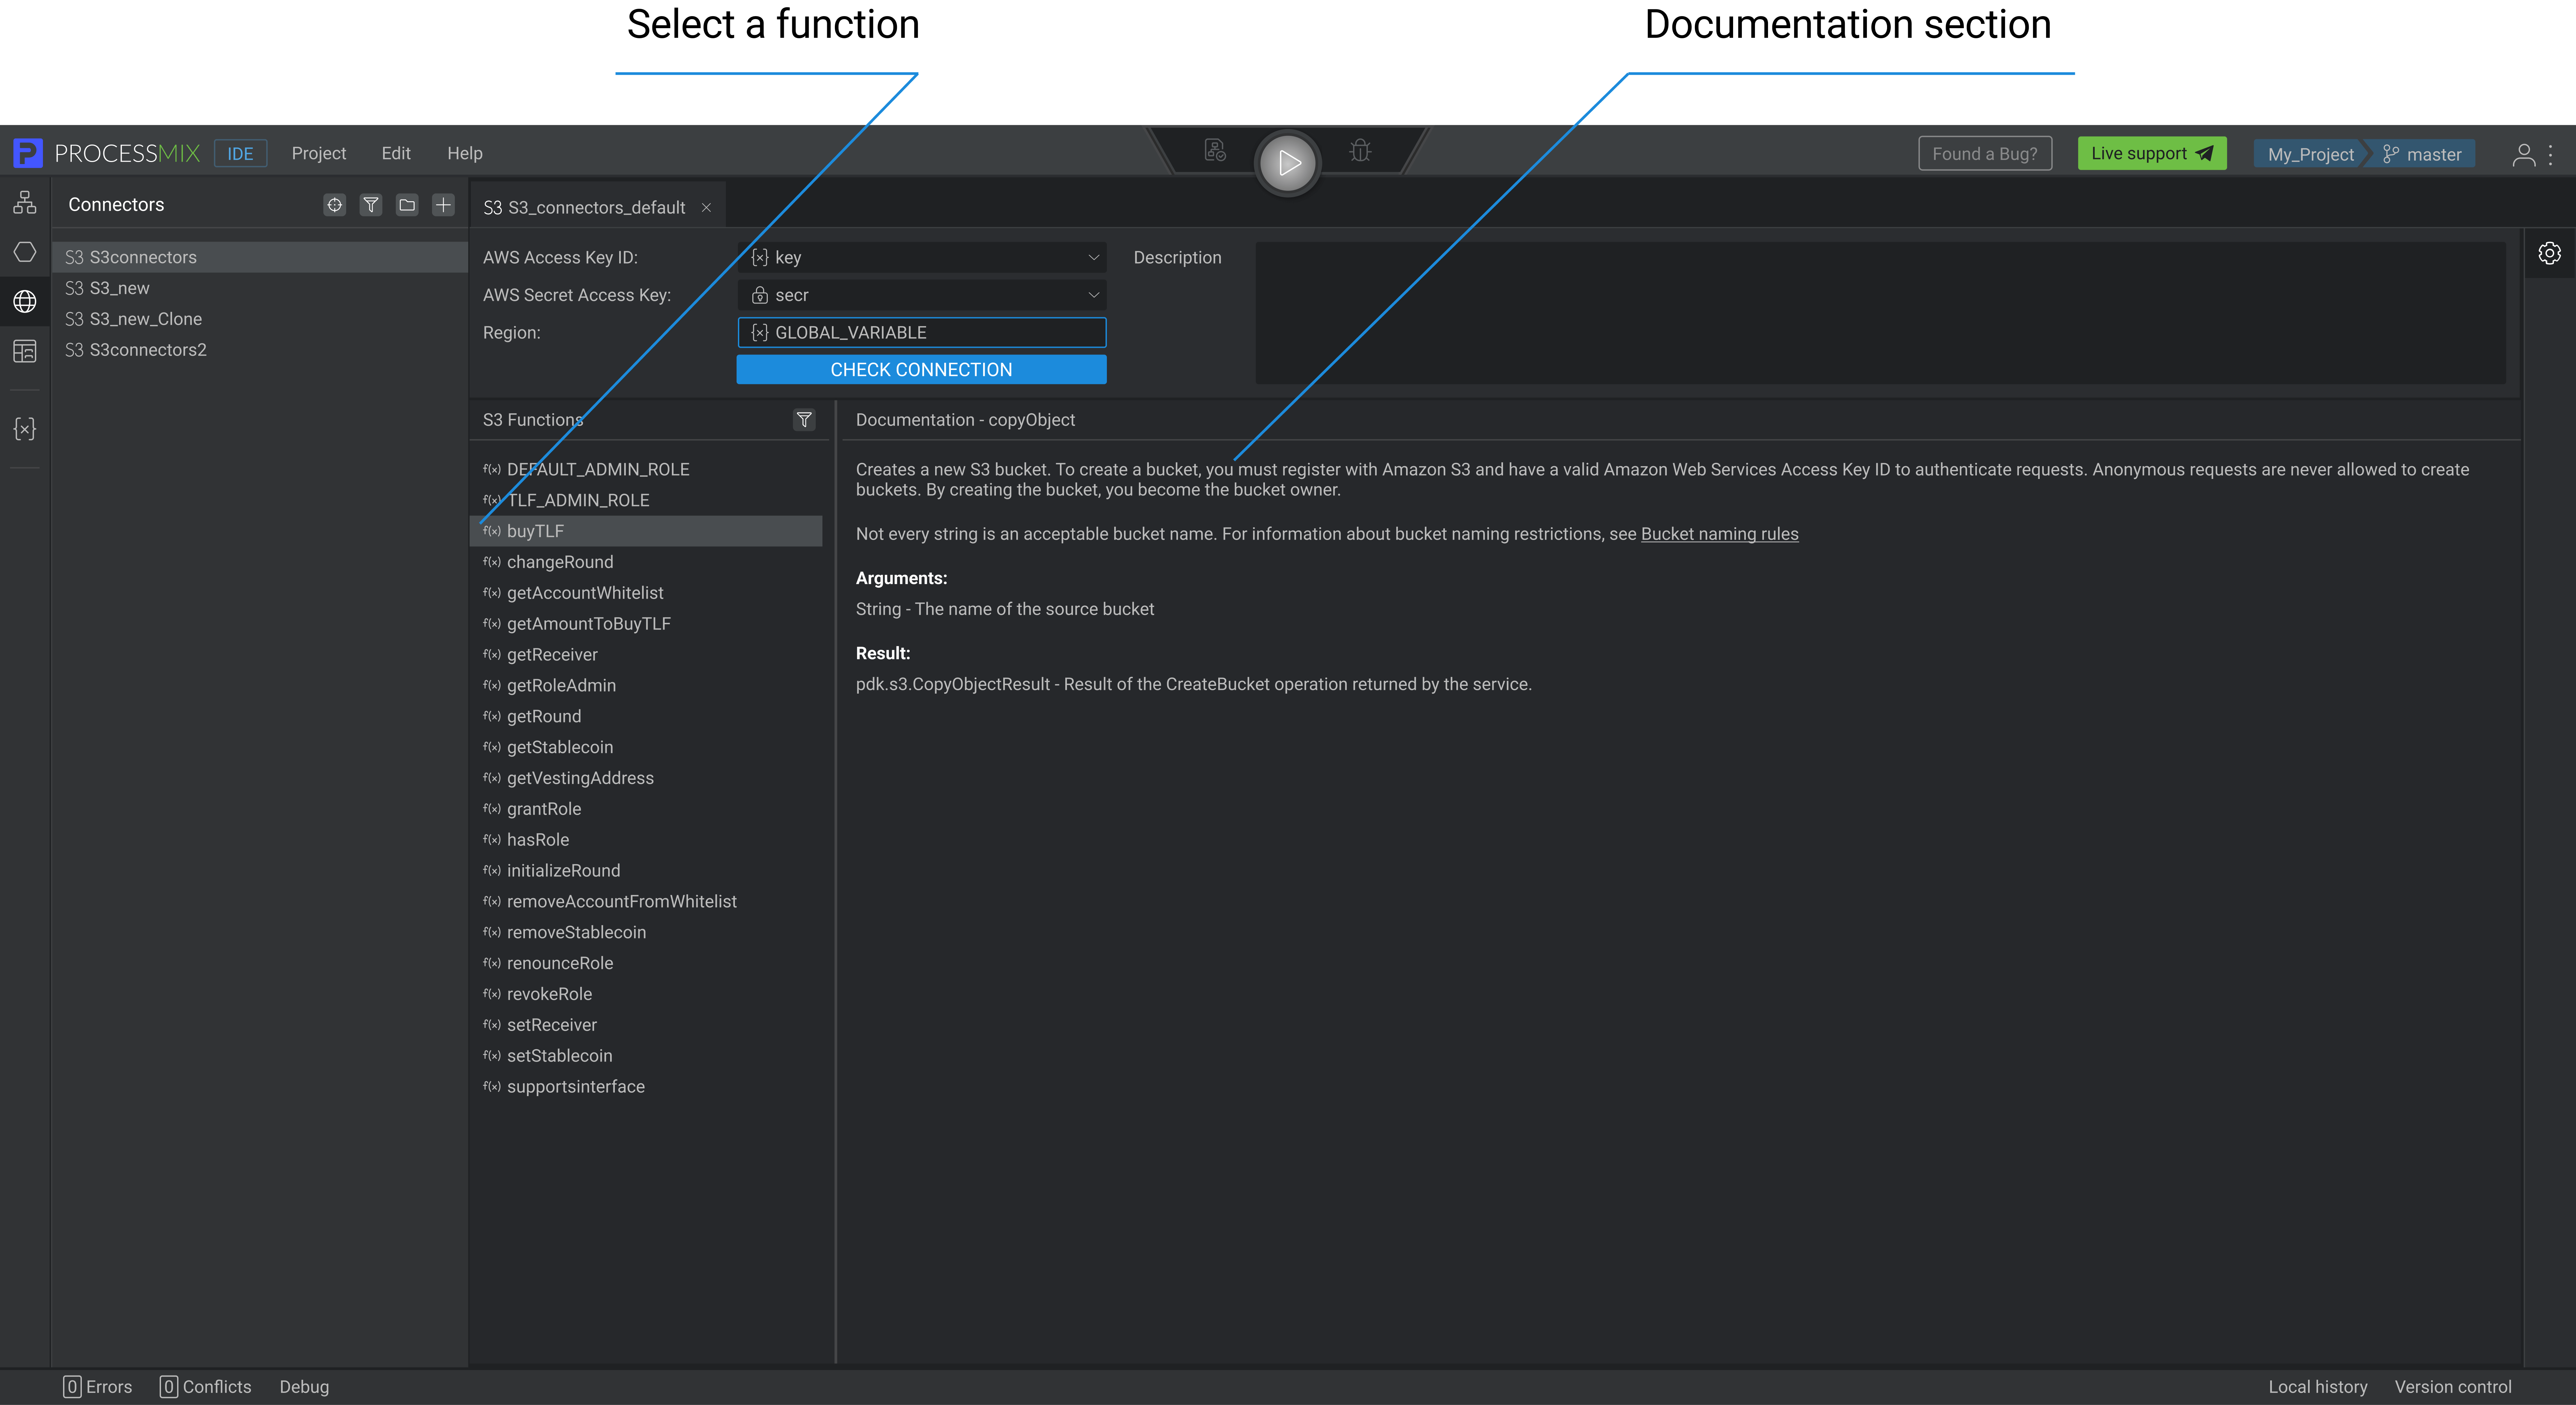
To filter Connector functions to find the necessary services, click on the Filter button :FilterDutton:. You will see a field in which you can enter the name of the element that you need to find and enter the requested value. The results of the match will be presented in the general list.
Additional operations with the S3 Connector
By clicking the right mouse button on Connector in the Explorer panel, a context menu opens through which several operations are available.
- Editing or double click on the name of the connector allows you to open the connector.
- Copy allows you to copy the connector to transfer it later.
- Clone allows you to create a clone of the connector. The cloned connector will have the same name as the Name of the parent connector + Clone(n).
- Cut allows you to cut connectors for transfer later.
- Paste allows you to paste the connector. It is not available unless you have previously used the Copy or Cut options.
- Rename allows you to rename the connector.
- Delete allows you to delete the connector.
How to use S3 Connector in flow
To use the S3 connector in a flow, you need to embed a S3 node in the flow. For detailed information, see the Nodes section.
If you use the S3 node in the flow, you can select a flow output using a structure selector. To choose a flow output as a structure, navigate to the flow settings, find the output field, and click “See all.” In the pop-up that opens, expand the PDK folder, followed by the S3 folder. Select a structure that corresponds to the function you are using in the flow.
 Visual Development
 Assignment of risk level and customer category within KYC processes during customer onboarding
 Cross-sell offer calculation for a 12MM strong client portfolio