- Development
-
-
- Menu Item
 Visual Development
Build powerful business apps for automation, decision-making, and customer service using an intuitive, visual drag-and-drop interface.
- Data model
Develop data models that support data types of any complexity and structure them in arrays, maps, JSON objects, or other custom data markups.
- Integrations
Utilize the built-in connector builder to seamlessly connect ProcessMIX applications to various databases, REST/SOAP web services, or even blockchain integration.
- Decision Tables
Create complex business logic and handle a large number of rules simultaneously in tabular format.
- Scorecards
Calculate final scores based on the input parameters of certain characteristics to improve your decision-making.
- PMML
Execute existing models based on Predictive Model Markup Language (PMML) to define statistical and data mining models.
- Version control
Facilitate app development with ProcessMIX version control for code change monitoring, history, reversion, and dev team collaboration.
- Debug and test
Streamline your development process by testing and debugging your app's flows while monitoring their performance at each execution breakpoint. Accelerate your development with easy access to application logs within Processmix, facilitating faster troubleshooting and enhancing your overall development efficiency.
- Deploy and use
Quickly deploy REST/SOAP/scheduled apps in the cloud with a single click using ProcessMIX. Benefit from Docker packaging, Kubernetes service, or AWS cloud support. Export projects as JAR/WAR or Java source code for flexibility in utilizing them according to your software development goals.
- Menu Item
-
-
- Solutions
 Visual Development
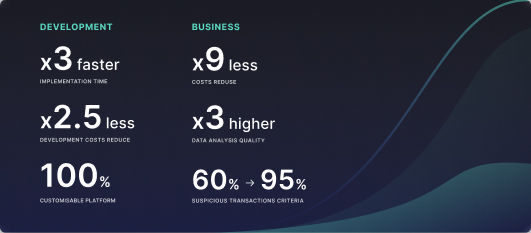 Assignment of risk level and customer category within KYC processes at customer onboarding
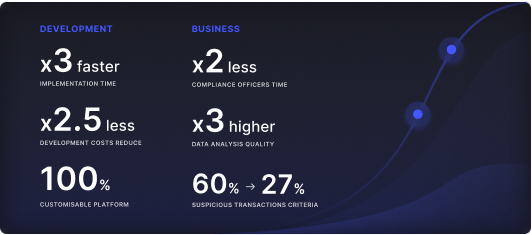 Cross-Sell Offer Calculation for the 12M Client Base
Deploy and Use
In order for the project to become available for use and further integration, it is necessary to deploy it. As a result of creating a project deployment, a Java application is built and endpoints are formed for each flow.
How to deploy the project?
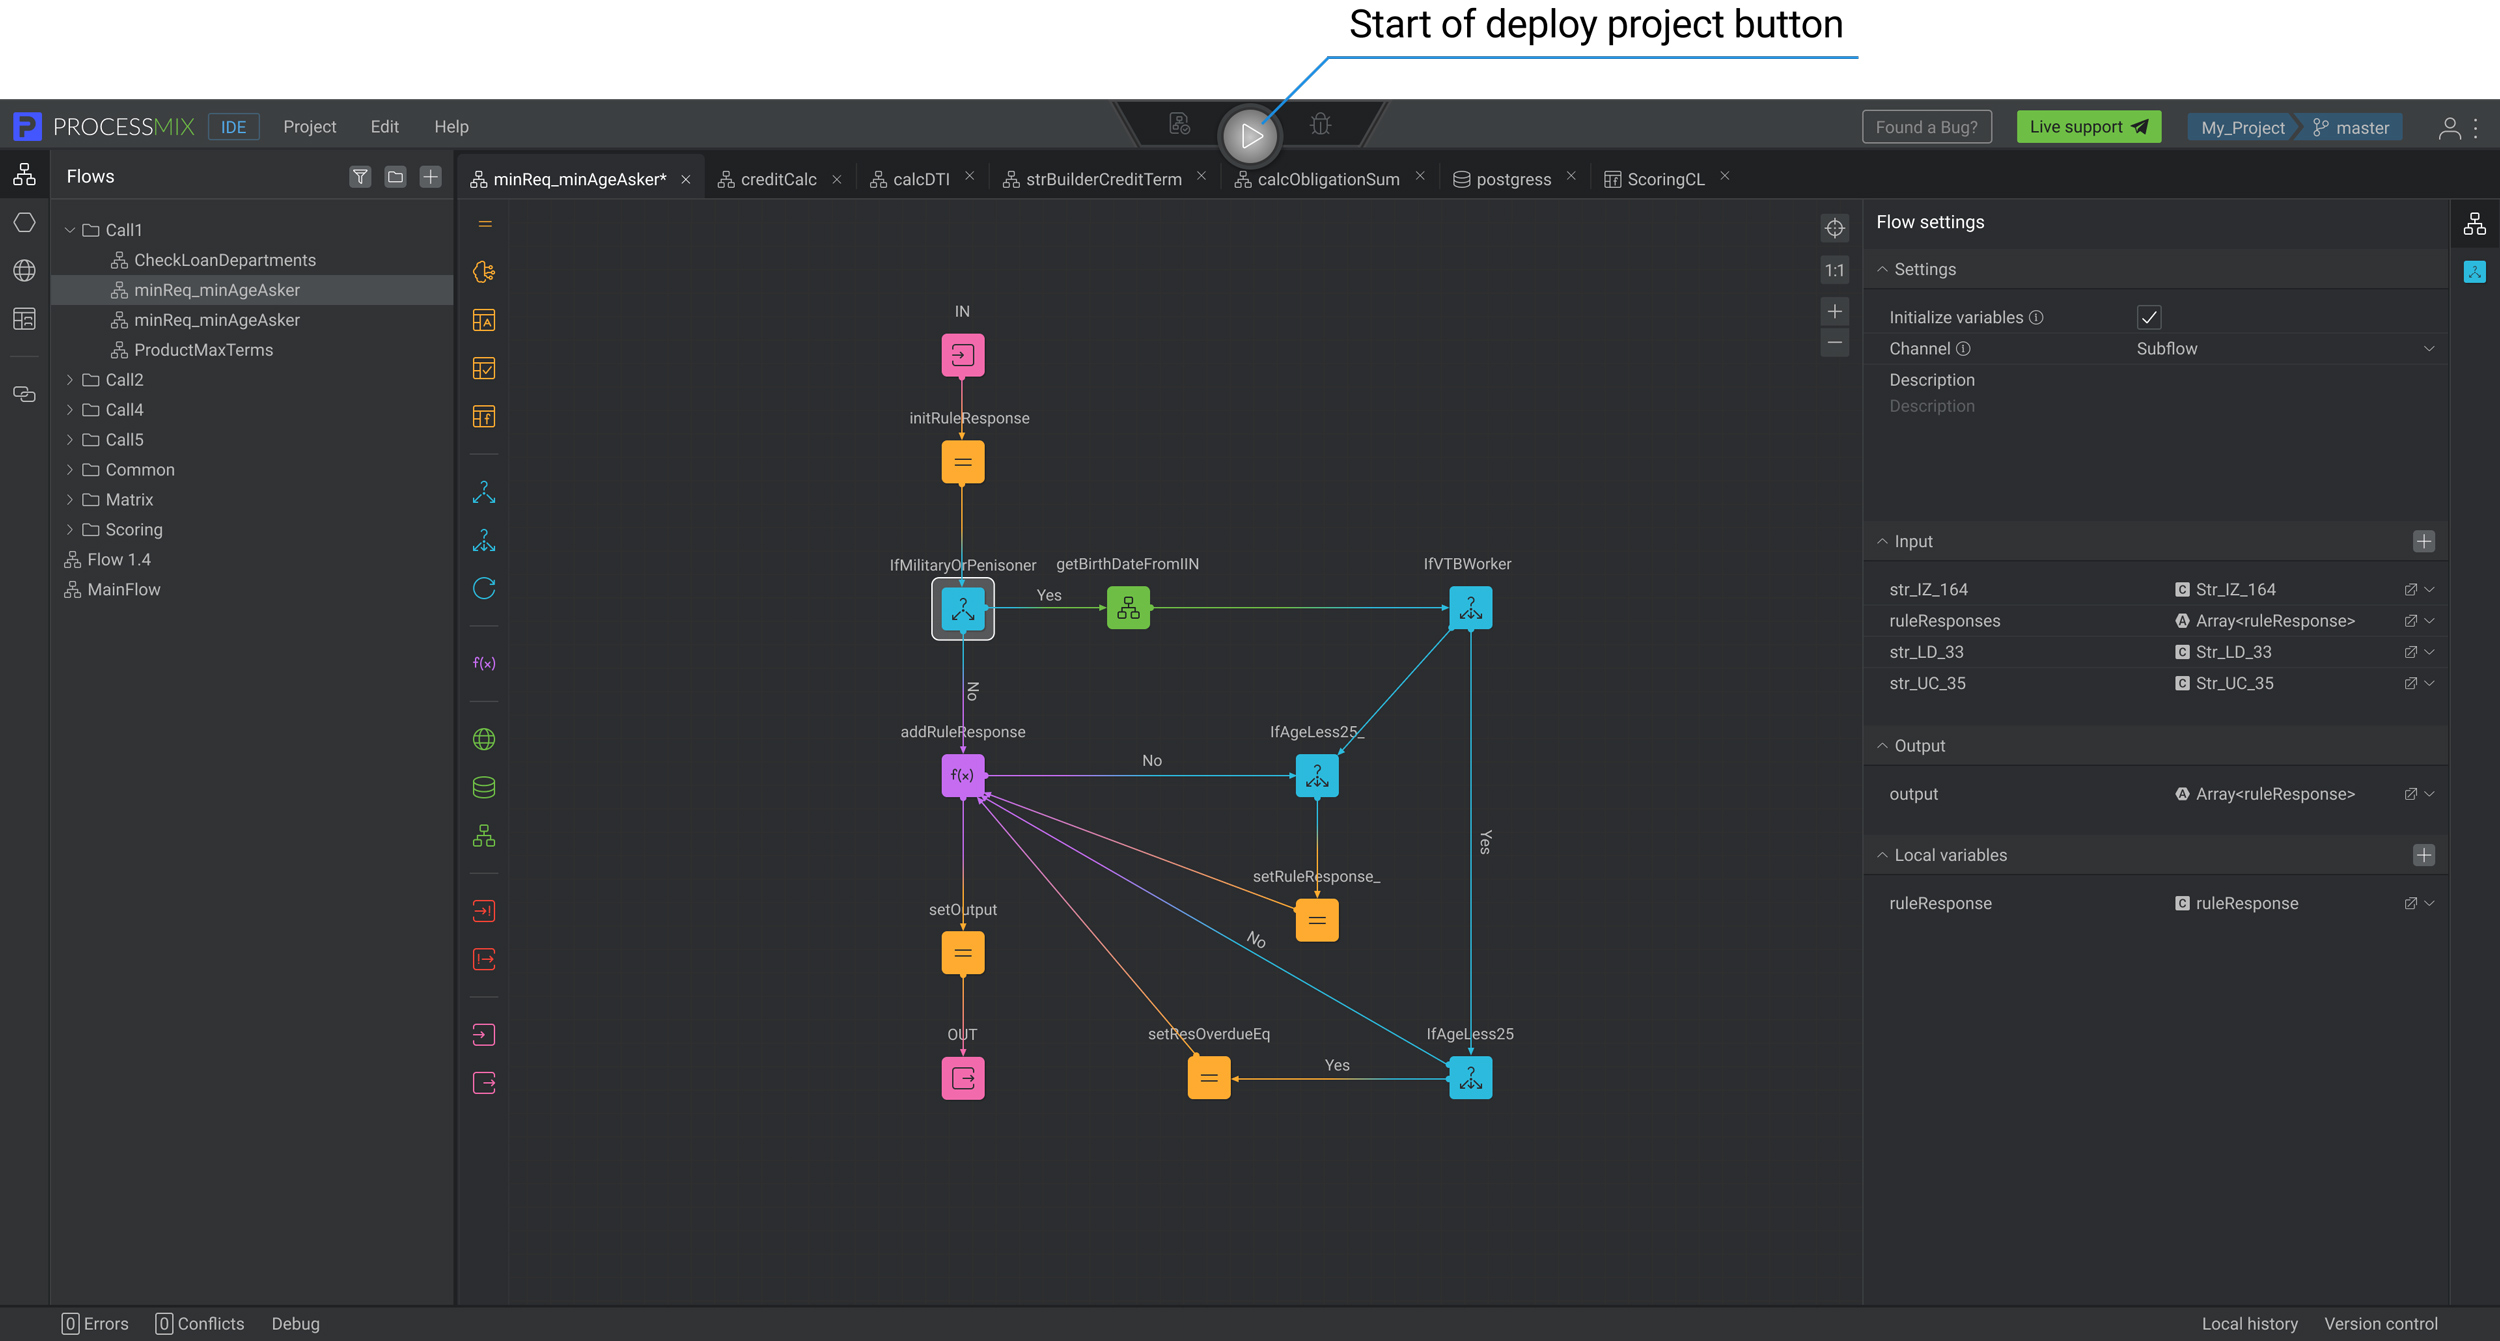
To deploy a project, the user should click the gray Run button with the Play symbol at the top center of the IDE. The build process of the project is initiated. The button changes its state and a green progress bar appears. Please wait for the process to finish. If there are any errors during the project build, please contact technical support.
The user can start the deployment if at least one flow has been previously created.

There is a grey Loading symbol instead of the Play symbol. This means project deploy is in progress, wait for it to be completed.

If the Run button is initially red, that means that the project can’t be deployed. You need to go to the error panel and make fixes to the project. Then try again.

If the deployment process was successful, the user sees a green button with a Pause symbol. Test Helper and Debug become available after a successful run or build of the project.

If the project was deployed, but the user made changes to the project that caused errors, the Run button turns red with an update symbol.

If the project was deployed, but the user made changes to the project, the deploy button is blue. To start deploying the project with changes, refresh the deployment by clicking the Run button.

To fork a project means creating a copy of the project’s source code to use it independently of the original project. You create a separate branch of the project to familiarize yourself with the functionality and be able to reuse or modify it without affecting the original project.
To go to the Test Helper, the user should click on the corresponding button if it is available.
To go to the Debug, the user should click on the corresponding button, if it is available, to the left of the green button with the Pause symbol.
How to use the project?
After the successful deployment of the project, the user can get the project data in a convenient form for further use and integration.
To do this, in the top panel of the IDE, select the Project section. After that project Export.
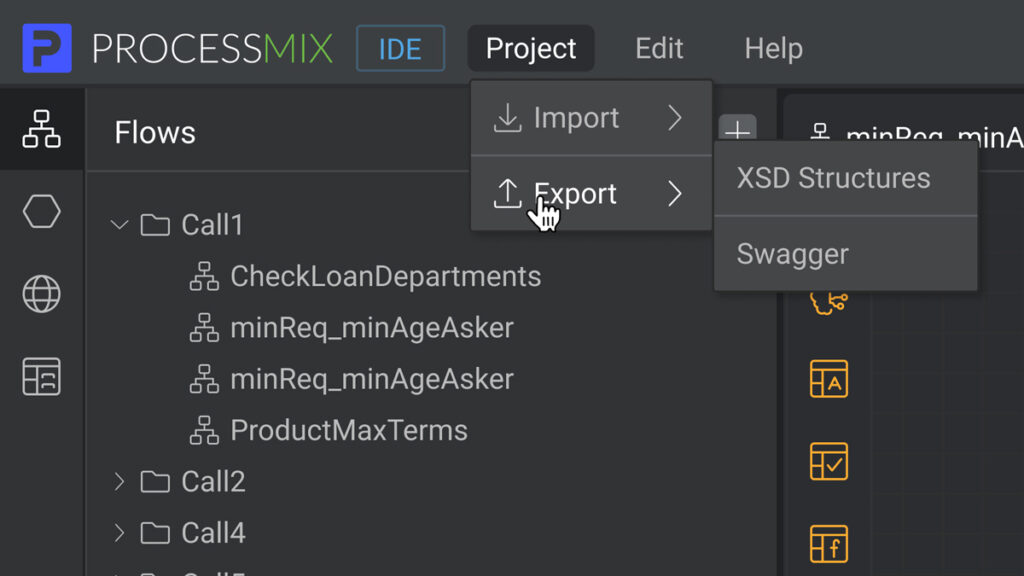
The following export types are available:
- Project Instance (only for on-premises installations) — a project presented in the JSON format in accordance with a predefined file structure. The exported Project Instance can be reused by the user in the ProcessMIX system via import.
- JAR (Java Archive) — is a package file format typically used to aggregate many Java class files and associated metadata and resources into one file to distribute application software or libraries on the Java platform. Users can run a JAR file using Java 11.
- WAR (Web Archive) — is an archive that contains all the parts of a web application: Java class files for servlets and web services, and other resources.To deploy a WAR archive, the user can use Apache Tomcat or Wildfly 14.0.1.
- Source code — is an archive that contains the pure Java code of an application. It is necessary to create a copy of the project in the form of source code, which can be used in other development environments or shared with other developers.
- Swagger — is a project used to describe and document RESTful APIs. The Swagger specification defines a set of files required to describe such an API. As part of the ProcessMIX system, the user receives SwaggerUI, which contains requests to the API, which can be used for integration with other services.
- WSDL — is an XML notation for describing a web service. A WSDL definition tells a client how to compose a web service request and describes the interface that the web service provider provides.
Project Instance is always available for export, and Swagger or WSDL is available only after project deployment.
To get the project in a certain view for use, the user needs to click on the required view.
How to access deployment from an external system?
To interact with a deployment via an external system or application (for example, Postman), the user needs to add a binding URL and Access Key to their request.
A binding URL typically consists of a base URL of the deployment and a path that identifies an endpoint (flow) to be accessed.
To get a base URL, export the project to Swagger and copy a base URL.
Also in the SWAGGER you can find all available endpoints for the project, use /eval endpoint to send a request to perform in the flow.
The Access Key is stored in the deployment settings within the Deployment section of the Home application. The administrator and owner can get the Access Key. To start the flow you need to add its value to the header of the request as an API-Key to receive access.
How to deploy exported JAR and WAR archives?
To successfully deploy JAR and WAR archives exported from the system, it is necessary to set specific environment variables:
CRYPTO_RSA_KEY_PUBLIC
CRYPTO_RSA_KEY_PRIVATE
Variables should be set in the configuration files of the application server (such as Tomcat, WildFly) or JVM at the environment level where the archive is being deployed. Variables added to the system properties section with their specified values (Access key). The Access Key is stored in the deployment settings within the Deployment section of the Home application.